Between a nearby HomePod, my Mac mini speakers, and an attached USB mic with a headphone input, I frequently change my sound output on my Mac.
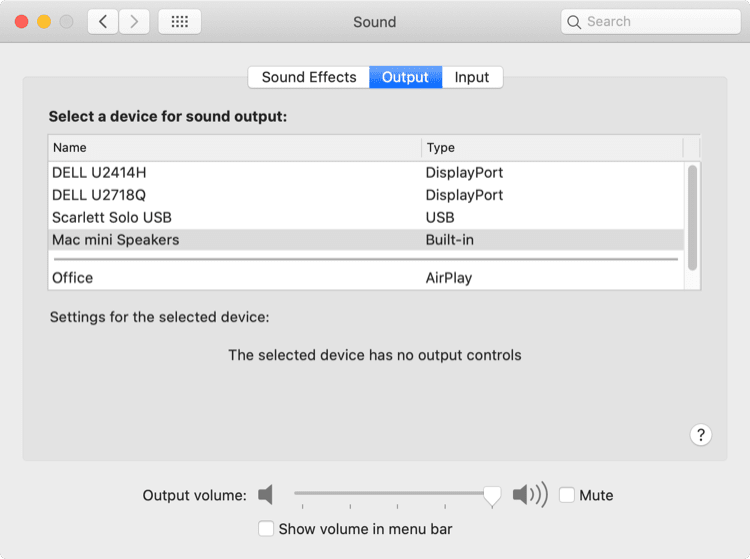
Changing the output is simple enough, but it’s annoying to open System Preferences, click the Output tab, and choose a new output.
Keyboard Maestro is great at this kind of stuff. 1 The app lets you automate nearly anything on your Mac. Control applications, manipulate text and images, run scripts—you name it! As of this post the app is only $36, though I’d gladly pay much more for it. There’s even a generous free trial!
Get Keyboard MaestroNote: It’s not difficult to do some fairly basic things in Keyboard Maestro. You don’t need to know how to code or anything like that. If you get stuck there’s a fairly extensive WIKI page and a great forum community for more specific questions. The easiest way to learn it, however, is probably with David Spark’s field guide.
It’s a simple macro, but it’s great to quickly switch to my over-ear headphones when I get a FaceTime audio call or to quickly Airplay to my HomePod mini.
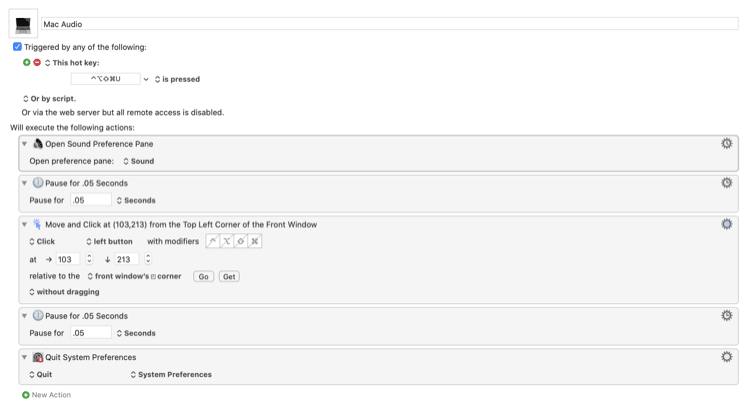
If you already have Keyboard Maestro you can get the macro here:
I’ll link to this macro below, but here’s a few things to note:
I add pauses because…well, it’s generally just good practice. Sometimes scripts don’t work well without them, so I nearly always add minuscule pauses to ensure scripts run smoothly.
To change the macro, open your System Preferences to the panel shown above and click Get in the Move and Click action. A countdown will begin. Click on the System Preferences pane to make it active and over your cursor over the sound output you’d like to use. When the countdown stops, Keyboard Maestro will grab the location of your mouse. That’s it. Next time you run it, it’ll select your new output.
I give similar macros the same hot key.2 When you press it, Keyboard Maestro displays a conflict palette.
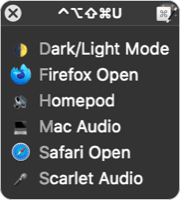
To further narrow your palette options, type a letter until only one macro remains at which point that macro is triggered. In this case, I press shift + control + option + cmd3. This presents the conflict palette. Pressing m triggers “Mac audio” automatically since it’s the only macro that starts with an M.
While you can set up AirPods or other bluetooth speakers to your output using this macro, I’ve used a different single-use app for that. It’s called Toothfairy and its sole purpose is to one-click/keypress connect or disconnect bluetooth devices to your Mac.
Get Toothfairy AppI tried doing this with AppleScript, but 1) it was slower than using Keyboard Maestro and 2) I couldn’t get it to work for my HomePod. If you don’t want to buy Keyboard Maestro, just google “AppleScript change sound output” and you’ll find several scripts for standard sound outputs you can run for free through Automator. ↩︎
Adding a Hyper Key with Karabiner Elements per Brett Terpstra’s instructions opens dozens more keyboard shortcuts. ↩︎
Again, with the hyper key…I’m not an animal. ↩︎
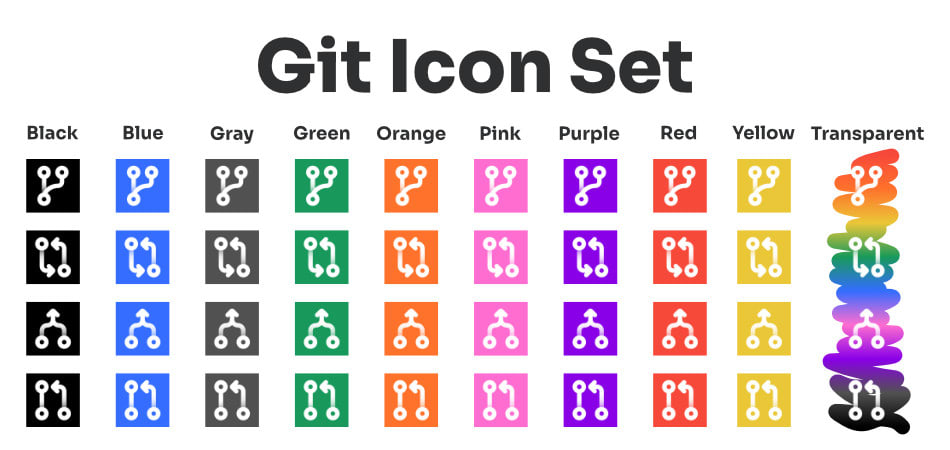 Feel free to download and use them however you like. All I ask is that you don't resell them.
Download Icon Set
# Delayed Texts with Apple Shortcuts
https://chrispennington.dev/blog/delayed-texts-with-apple-shortcuts
I created a system to scheduling out delayed text messages using Apple Shortcuts and Data Jar.
Feel free to download and use them however you like. All I ask is that you don't resell them.
Download Icon Set
# Delayed Texts with Apple Shortcuts
https://chrispennington.dev/blog/delayed-texts-with-apple-shortcuts
I created a system to scheduling out delayed text messages using Apple Shortcuts and Data Jar.
Sending emails on a delayed schedule has become a routine for me. For a while now I’ve wanted to create something to mimic the experience with text messages. Between Shortcuts and DataJar, I’ve created a delayed-text system to plan texts up to a week in the future.
Each night, I get a notification reminding me which texts are scheduled to send out the next morning and each morning my texts automatically send out.
If you don’t have Data Jar, it’s free to download and use. Get Data Jar
I created a dictionary called “delayed_texts”. Tap the plus icon, choose Dictionary, add “delayed_texts” in the Key field, and tap Save.
Tap your new “delayed_texts” dictionary. Once inside, create seven dictionaries, named for the days of the week (capitalized). Tap Add Value, choose Dictionary, add “Sunday” in the Key field, and tap Save. Repeat for each day of the week.
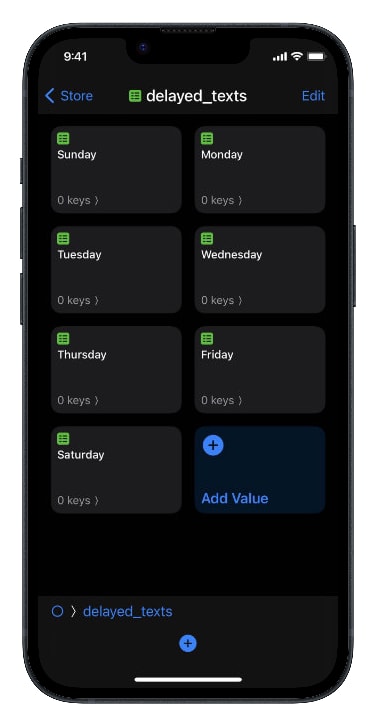
Note: To plug-and-play my shortcuts below, you must name and organize everything exactly as I’ve mentioned above—capitalization, data structure, etc.
I made three shortcuts. Download each and install them. If you’ve never installed someone’s shortcut, you’ll need to allow untrusted shortcuts first.
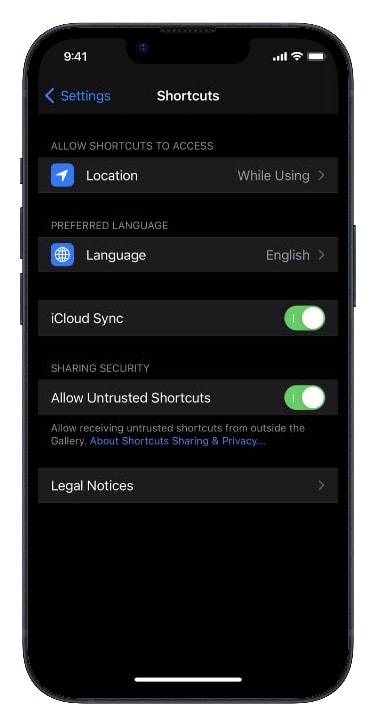
Then tap each of the three links below to open and install them.
Note: I’ve commented the Shortcuts, so you can follow the logic. If you have any questions, feel free to contact me.
I add this shortcut as a widget on my home screen so I can quickly tap it and plan a text. In short, it gathers information—the contact’s number, my message, and the day of the week to send the message—and adds it to DataJar.
The second shortcut sends me a report each evening. The notification includes any texts scheduled to go out the following day. I schedule mine each night at 9pm. With iOS 14, you can automate this process (more below).
The third shortcut looks in the current day’s dictionary within Data Jar, sends out any texts, and then clears the day for next week. I schedule mine to send out each morning at 8:01am.1 Once again, you can automate this process (more below).
To automate a Shortcut to run at a specific time:
Your Shortcut will run at the selected time. If you have any trouble, check out Apple’s support article on creating automations.
8:01 is before I’ll see anyone I’d text and after a decent hour for most people to receive texts. Being 8:01 doesn’t make people suspect automation, I’d think. ↩︎
Note: Saving cache makes the program run faster, so you may have to continually adjust this number until you find something that works well for your needs.
## Delete any Adobe cache files Removing old cache files can clear up any existing cache. There are a few different locations Adobe stores cache files. ### 1. Delete Application Support Adobe Cache 1. Open **Finder**. 2. Click the **Go** menu and choose **Library** (if you don’t see Library, press the option key). 3. Open the **Application Support** folder 4. Open the **Adobe** folder. 5. Open the **Common** folder. 6. Delete the **Media Cache** and the **Media Cache Files** folders. 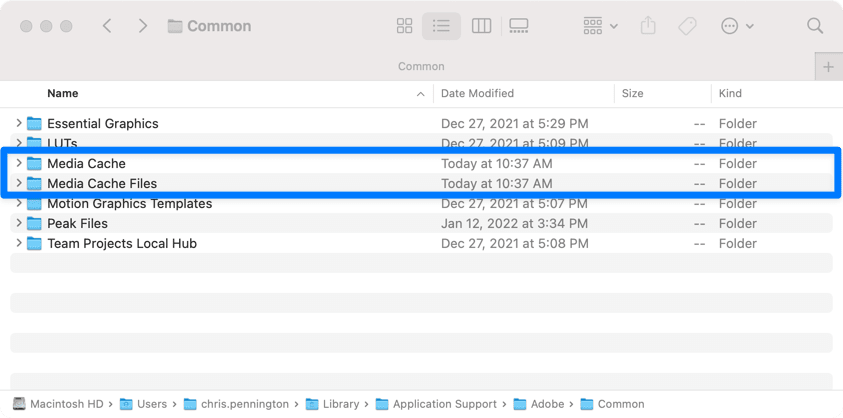 ### 2. Delete Adobe Cache from the Caches folder 1. Open **Finder**. 2. Click the **Go** menu and choose **Library** (if you don’t see Library, press the option key). 3. Open the **Caches** folder 4. Open the **Adobe** folder. 5. All your Adobe products will show. Open each folder and check the folder and any subfolders for Disk Cache folders. Delete any Disk Cache folders you find. 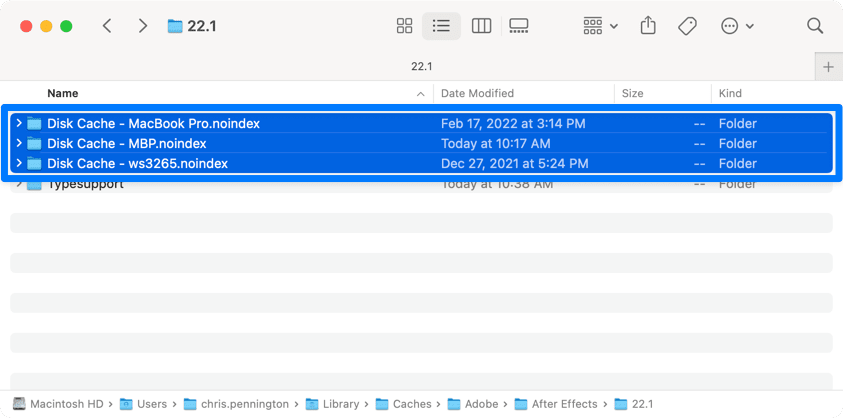 # Custom HTML Keyboard Maestro Prompt for Zendesk Support Articles https://chrispennington.dev/blog/custom-html-keyboard-maestro-prompt-for-zendesk-support-articles This Keyboard Maestro custom HTML prompt lets you query any Zendesk support center from your keyboard and allows for link pasting, previewing articles, and more. Keyboard Maestro has this amazing feature called a Custom HTML Prompt. In short, it lets you write a custom webpage popup that can receive variables from Keyboard Maestro and send form selections as outputs back into Keyboard Maestro.Note: To learn how to write custom HTML prompts yourself, see my previous article.
That flexibility opens up a bunch of possibilities. Zendesk includes a public API and offers some functionality (like the ability to query any public Zendesk support center) without authentication. I wrote a custom prmopt that lets you interact with these articles for my jobby-job where I write support articles. It’s been a game-changer when referencing our current articles in new articles. Because the HTML prompt is just a webpage, I wrote the macro with [Astro Build](https://astro.build) and [Tailwind CSS](https://tailwindcss.com) and then exported a minified version, which you can download here 👇.Note: It’s set to use Squarespace’s support center by default, but changing that variable field (called “zendeskBaseURL”) just before the script will let you customize it to any public Zendesk support center.
## A few custom features Just a few quick notes here. - I don’t like taking my hands off my keyboard, so I included a lot of keyboard navigation. - I added a ⌘ K palette to make it easy to recall the shortcuts. - In order to run any of the actions, you must have an item selected. If you don’t have something selected, the palette will shake to let you know you need to select something first.
- I very quickly adapted the code from a very customzied script to this one, so it may have a few oddities or areas where you could improve upon it. Go for it 😄.
Have fun! And reach out if you have any trouble.
# Add Styling to Keyboard Keys with CSS
https://chrispennington.dev/blog/add-styling-to-keyboard-keys-css
You can style keyboard input keys with the element so it looks more like a physical keycap. Here’s the custom CSS I use on my site.
In one of my jobby-jobs, I write user educational articles and record screencasts for a software company. We often instruct readers to press keyboard keys to accomplish some task. Our original styling looked something like this:
- In order to run any of the actions, you must have an item selected. If you don’t have something selected, the palette will shake to let you know you need to select something first.
- I very quickly adapted the code from a very customzied script to this one, so it may have a few oddities or areas where you could improve upon it. Go for it 😄.
Have fun! And reach out if you have any trouble.
# Add Styling to Keyboard Keys with CSS
https://chrispennington.dev/blog/add-styling-to-keyboard-keys-css
You can style keyboard input keys with the element so it looks more like a physical keycap. Here’s the custom CSS I use on my site.
In one of my jobby-jobs, I write user educational articles and record screencasts for a software company. We often instruct readers to press keyboard keys to accomplish some task. Our original styling looked something like this:
Press Cmd + C to copy.
I went in search for some better styling and here’s the result:Press Cmd + C to copy.
## KBD Element According to the [MDN Web Docs](https://developer.mozilla.org/en-US/docs/Web/HTML/Element/kbd), the `` element “represents a span of inline text denoting textual user input from a keyboard, voice input, or any other text entry device.” I wrap each key in a `` element, like this:<kbd>Enter</kbd>
## CSS Styling
I liked the styling MDN uses for the `` element, so I grabbed it an made a few modifications to better mach my style. See mine below.
Note: Since writing this article, I’ve made some changes to how I style the kbd element. But this styling above will still produce a great result!
Note: My dock is on the left normally (the only correct choice 😏), but I rotated the screenshot so it wouldn’t take up as much vertical space.
## 1. Open Terminal. Open your favorite Terminal application. ## 2. Choose spacer size. You can add a regular spacer or a small spacer. Copy and paste one of the scripts into your Terminal. Regular spacer script: ```shell defaults write com.apple.dock persistent-apps -array-add '{"tile-type"="spacer-tile";}'; killall Dock ``` Small spacer script: ```shell defaults write com.apple.dock persistent-apps -array-add '{"tile-type"="small-spacer-tile";}'; killall Dock ``` ## 3. Move the spacer(s). Drag and drop the spacer(s) to the desired location on your dock.Note: You can delete spacers like any other icon on your dock. Drag the icon off your dock to remove it from your dock or right-click and choose Remove from Dock.
# How to Crop a Gif to a Square https://chrispennington.dev/blog/20201218-how-to-crop-a-gif-to-a-square If you need to crop a gif to 1:1 or crop a gif to square, there's a great command line tool called gifsicle that can crop, resize, and adjust your gif in a bunch of different ways. I recently needed to crop a gif to a square and found this command-line tool for working with gifs called gifsicle. Here's a simple step-by-step guide to using it. ## 1. Install gifsicle. On a Mac, you can install gifsicle using Home-brew with the following command: ```shell brew install gifsicle ``` ## 2. Determine the final size of your gif. Here's a gif of the legendary Jurgen Klopp. It's 480x270. I want my final gif to be a 1:1 square, so 270x270 is my target size. ## 3. Crop the image.
Open Terminal and cd to the directory where your image is found.
Next, let's crop the image. According to the documentation, we need to provide four things.
1. The name `gifsicle` to call the tool.
2. The crop option (tell it the size, positioning, etc. of the crop) .
3. An input file.
4. An output file.
Numbers 1, 3, and 4 are self-explanatorry, so let's focus on #2. The crop option takes four parameters: _x1, y1 + width x height_. The first two tell it where to start the crop from. 0,0 will start the crop from the top right-hand corner (i.e., x1 = 0 and y1 = 0). We'll center the image in a later step. For now, let's just work on getting it to crop the image. Next, we provide the cropped dimension: 270x270 as our _width_ and _height_ respectively.
In all, here's the command.
```shell
gifsicle --crop 0,0+270x270 resize-gif.gif > resize-gif-cropped.gif
```
The greater than sign tells it to take the original file (i.e., "resize-gif.gif") and save the cropped version as "resize-gif-cropped.gif" in the same directory.
Here's the output:
## 3. Crop the image.
Open Terminal and cd to the directory where your image is found.
Next, let's crop the image. According to the documentation, we need to provide four things.
1. The name `gifsicle` to call the tool.
2. The crop option (tell it the size, positioning, etc. of the crop) .
3. An input file.
4. An output file.
Numbers 1, 3, and 4 are self-explanatorry, so let's focus on #2. The crop option takes four parameters: _x1, y1 + width x height_. The first two tell it where to start the crop from. 0,0 will start the crop from the top right-hand corner (i.e., x1 = 0 and y1 = 0). We'll center the image in a later step. For now, let's just work on getting it to crop the image. Next, we provide the cropped dimension: 270x270 as our _width_ and _height_ respectively.
In all, here's the command.
```shell
gifsicle --crop 0,0+270x270 resize-gif.gif > resize-gif-cropped.gif
```
The greater than sign tells it to take the original file (i.e., "resize-gif.gif") and save the cropped version as "resize-gif-cropped.gif" in the same directory.
Here's the output:
 Almost right…but it's offset to the top right-hand corner, so we're not getting the middle of the gif cropped to a 1:1 square.
## 3. Determine the offset.
To keep that crop in the center, then, I'll need 105px offset. You can find that with this simple formula: _((total longest side) - (total desired length)) / 2_
In my example, that's (480px - 270px)/2 = 105px. Here's a visual if it helps.
Almost right…but it's offset to the top right-hand corner, so we're not getting the middle of the gif cropped to a 1:1 square.
## 3. Determine the offset.
To keep that crop in the center, then, I'll need 105px offset. You can find that with this simple formula: _((total longest side) - (total desired length)) / 2_
In my example, that's (480px - 270px)/2 = 105px. Here's a visual if it helps.
 ## 4. Crop the final image.
We can apply that to our command line input above, adding a 105px offset in the x1 parameter of the crop option. Leaving us with the following:
```shell
gifsicle --crop 105,0+270x270 resize-gif.gif > resize-gif-cropped.gif
```
Here's the result.
## 4. Crop the final image.
We can apply that to our command line input above, adding a 105px offset in the x1 parameter of the crop option. Leaving us with the following:
```shell
gifsicle --crop 105,0+270x270 resize-gif.gif > resize-gif-cropped.gif
```
Here's the result.
 ## 5. Optional additions.
It's important to note that according to the documentation, "Cropping takes place before any rotation, flipping, resizing, or positioning." That means if you want to do anything else (like resize, flip, etc.), realize that cropping takes place first. For me, this means I put it first in the command so I don't forget the order.
Here's an example. If you want to both resize and crop the image, the crop is done first.
As an example…
```shell
gifsicle --crop 105,0+270x270 --resize 100x100 resize-gif.gif > resize-gif-cropped-resized.gif
```
## 5. Optional additions.
It's important to note that according to the documentation, "Cropping takes place before any rotation, flipping, resizing, or positioning." That means if you want to do anything else (like resize, flip, etc.), realize that cropping takes place first. For me, this means I put it first in the command so I don't forget the order.
Here's an example. If you want to both resize and crop the image, the crop is done first.
As an example…
```shell
gifsicle --crop 105,0+270x270 --resize 100x100 resize-gif.gif > resize-gif-cropped-resized.gif
```
 # Custom HTML Prompt With Keyboard Maestro
https://chrispennington.dev/blog/custom-html-prompt-with-keyboard-maestro
Keyboard Maestro’s Custom Floating HTML Prompt opens the door to endless automation with web languages and tools like HTML, CSS, and JavaScript. I wrote a custom HTML prompt script in Keyboard Maestro that let’s me quickly copy YouTube links from my channel.
Keyboard Maestro is incredible (in part) because it has something for everyone—from beginner to advanced. Being simple to use makes it accessible to anyone, but I’m constantly discovering more advanced features.
My most recent discovery came a few months ago when working one of my jobby-jobs. I write user education support articles for a software company as a contractor. The company’s software contains hundreds of icon assets we use when writing articles. Every asset was the same except for the ID, and I knew Keyboard Maestro must have a way to automate inserting these icons. Enter the [Custom Floating HTML Prompt](https://wiki.keyboardmaestro.com/action/Custom_HTML_Prompt)! You can code little mini webpages using HTML, CSS, and JavaScript and pass and receive data from/into Keyboard Maestro.
I’ve continued using the base structure of the script for personal things as well. Using the native JavaScript Fetch API, for instance, I access an endpoint and fetch my videos (thumbails included). Using JavaScript, I added keyboard events to keep my hands on the keyboard, which makes it easy to navigate the list, choose a video, and paste the full YouTube link!
## How to Write a Custom Floating HTML Prompt
Per the [Keyboard Maestro docs](https://wiki.keyboardmaestro.com/action/Custom_HTML_Prompt), “[the prompt] allows you to display an entirely customized window to gather or display information.” In short, you need to design a full webpage with an embedded form. You can pass Keyboard Maestro variables into and from the HTML form on submit and then carry on with a macro like normal.
# Custom HTML Prompt With Keyboard Maestro
https://chrispennington.dev/blog/custom-html-prompt-with-keyboard-maestro
Keyboard Maestro’s Custom Floating HTML Prompt opens the door to endless automation with web languages and tools like HTML, CSS, and JavaScript. I wrote a custom HTML prompt script in Keyboard Maestro that let’s me quickly copy YouTube links from my channel.
Keyboard Maestro is incredible (in part) because it has something for everyone—from beginner to advanced. Being simple to use makes it accessible to anyone, but I’m constantly discovering more advanced features.
My most recent discovery came a few months ago when working one of my jobby-jobs. I write user education support articles for a software company as a contractor. The company’s software contains hundreds of icon assets we use when writing articles. Every asset was the same except for the ID, and I knew Keyboard Maestro must have a way to automate inserting these icons. Enter the [Custom Floating HTML Prompt](https://wiki.keyboardmaestro.com/action/Custom_HTML_Prompt)! You can code little mini webpages using HTML, CSS, and JavaScript and pass and receive data from/into Keyboard Maestro.
I’ve continued using the base structure of the script for personal things as well. Using the native JavaScript Fetch API, for instance, I access an endpoint and fetch my videos (thumbails included). Using JavaScript, I added keyboard events to keep my hands on the keyboard, which makes it easy to navigate the list, choose a video, and paste the full YouTube link!
## How to Write a Custom Floating HTML Prompt
Per the [Keyboard Maestro docs](https://wiki.keyboardmaestro.com/action/Custom_HTML_Prompt), “[the prompt] allows you to display an entirely customized window to gather or display information.” In short, you need to design a full webpage with an embedded form. You can pass Keyboard Maestro variables into and from the HTML form on submit and then carry on with a macro like normal.
Note: I give you the code for the HTML file piece-by-piece below. If you don’t want to recreate it along with me, you can access the full code here.
### 1. Add core HTML. There are a few things you’ll notice in my example code: - I’ve set the size of the window in a data attribute on the body (data-kmwindow="520, 945"). This tells Keyboard Maestro to set the window size to 520px wide and 945px tall.
- I turned off autocomplete and spellcheck on the input field to prevent macOS from suggesting or correcting inputs and set an autofocus attribute so the input is selected as soon as the window appears.
```html
Note: You can either type your code directly into Keyboard Maestro or reference an HTML file. I’d recommend an HTML file so you can write the code in a code editor meant for web development. Select Custom prompt with HTML file in the Custom Floating HTML Prompt action. If that doesn’t make sense, if you download the macro at the end of the article, I think it will. Basically, write this code in a code editor, not inside Keyboard Maestro.
### 2. Add custom CSS. There’s not a lot to say here because you can use normal CSS to style the window—like any webpage. Because it’s in an HTML doc, you’ll have to add the CSS in *style* tags.Note: The docs do mention, “You will probably also need to specify the body width in the body CSS in order to ensure proper HTML display: e.g., body {width: 420px;}.”
Note: I have a serverless node function calling the YouTube API with my PLAYLIST_ID and YOUTUBE_API key like this: "https://www.googleapis.com/youtube/v3/playlistItems?part=snippet&playlistId={YOUTUBE_API}&maxResults=100&key={YOUTUBE_API}". It parses the JSON to and endpoint which is what my Keyboard Maestro script calls as my ENDPOINT.
A few things to note: - During the cancelMacro and submitMacro functions, I set a Keyboard Maestro variable 'cancel' to either 'true' or 'false' depending on whether I’m cancelling or submitting the form. I use this varible in the Keyboard Maestro macro to determine whether to paste the YouTube link or not (more on that in a moment). - For the submitMacro function, I’m also grabbing the selected video’s value attribute and updating a Keyboard Maestro variable called 'youTubeID' with the value. - I’ve added some basic keyboard events so you can arrow down to results, etc. - I have a function that filters as you search, dynamically updating the list of videos. - The View All button reprocesses the entire list of videos and adds them all to the list. - Lastly, notice that I do not have a 'name' attribute on my input elements so Keyboard Maestro doesn’t pull in the inputs as variables (that’s how I understand the documentation). Alternatively, I could include the 'name' attribute and add 'data-kmignore' as an attribute of the input. For more help on preventing initializing or saving Keyboard Maestro variables in your script, see the documentation under the Excluding Set and/or Saving of Form Fields heading. ### 4. Build the Keyboard Maestro macro. Other than the two small functions dealing with Keyboard Maestro, everything else is pure HTML, CSS, and JavaScript. But you do have to actually create a macro. Mine contains two actions: 1) the Custom floating HTML prompt pointing to my file and 2) an if statement that checks if I’m cancelling or submitting the form and then pastes the YouTube link if I’m submitting the form.  Here is the macro if you don’t want to rebuild those two steps.Note: Again, if you don’t want to recreate the HTML file along with me, you can access the full code here.
# Compile and Minify SCSS with Gulpjs in Hugo https://chrispennington.dev/blog/20201219-compile-and-minify-scss-with-gulpjs-in-hugo With GulpJS, you can automatically compile, prefix, minify, and rename your SCSS to CSS.Note: If you prefer a video version of this post, check out the corresponding video on my YouTube channel.
I’ve been working with Hugo, the static site generator, for a few months now. I’m new to the web development world and the simplicity of Hugo has been a big advantage.
As I’ve learned SCSS, I’ve been using Live Sass Compiler, the Visual Studio Code plugin. While the general workflow is efficient and simple, I wanted to add a few elements and stumbled upon GulpJS.
It’s a command line utility for NodeJS that automates workflows. Very simple put, you feed files into one end of the pipeline and then give it a series of automations to run in a sequence. When it finishes, your finalized code exists the pipe. There are thousands of plugins (and I’m just figuring out how to use them), but this post will show you to compile and minify SCSS or SASS with GulpJS.
To check to see if you have NodeJS, open Terminal and type the following command:
```shell node -v ```If you get a number back, that means you have NodeJS installed. If you don’t have it installed go to nodejs.org, download, and install NodeJS.
With NodeJS installed, cd to your directory and create a package.json file. The file essentially tracks your node dependencies. Type the following command:
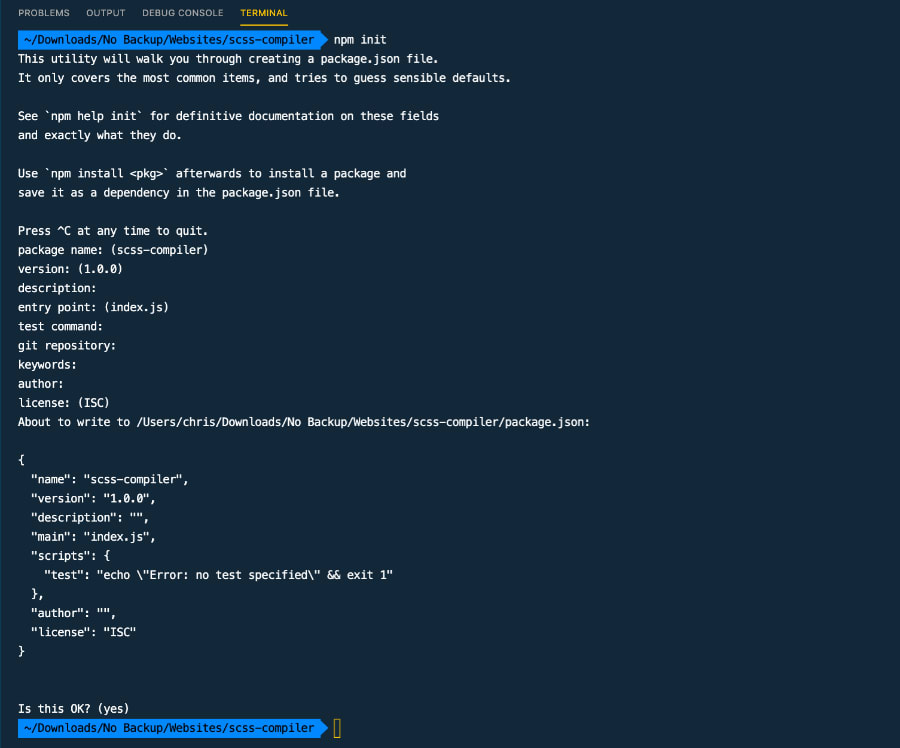
```shell npm init ```This will prompt you with a series of questions. Just hit the Enter button on your keyboard until it finishes and creates a package.json file.
You need to install Gulp both globally and in your website’s directory.
This installs Gulp locally and adds it under devDependenies in your package.json file.
As I mentioned above, Gulp has thousands of plugins. You can see a full list here. For the workflow I’m showing you, you’ll need four plugins. Install them one after the other, using the following commands:
This plugin compiles your SCSS or SASS into CSS.
```shell npm install gulp-sass --save-dev ```This plugin adds backwards compatibility for older web browsers to your CSS.
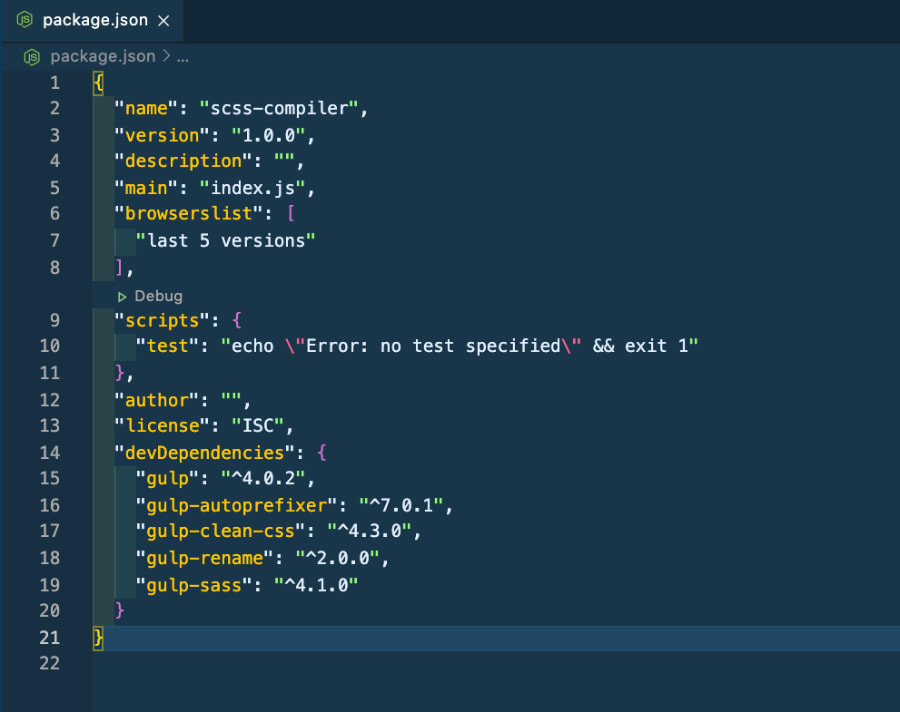
```shell npm install gulp-autoprefixer --save-dev ```Important! In order for this plugin to work correctly, you also need to add the following to your package.json: "browserslist": ["last 5 versions"], It tells the autoprefixer plugin how far backwards it should make your code compatible. Add it just before the “scripts” section in the package.json file. I’ll show you an example of my completed code below.
This plugin minifies your CSS to help your code load faster.
```shell npm install gulp-clean-css --save-dev ```This plugin renames your file. I use it to add “.min” to the file.
```shell npm install gulp-rename --save-dev ```Your package.json file should now look like this. Notice the "browserlist" config at the top for the autoprefixer plugin adn the devDependencies generated by the install code above.
In the root of your website directory, add “gulpfile.js” as a new file.
You need to provide two things in your file:
Add this code to your gulpfile.js and save it.
```javascript const gulp = require('gulp'); const sass = require('gulp-sass'); const prefix = require('gulp-autoprefixer'); const minify = require('gulp-clean-css'); const rename = require('gulp-rename'); gulp.task('compilescss', function() { gulp.src('./src/css/*.scss') .pipe(sass()) .pipe(prefix()) .pipe(minify()) .pipe(rename(function (path) { return { dirname: path.dirname + "", basename: path.basename + ".min", extname: ".css" }; })) .pipe(gulp.dest('./static/css')) }); ```Note: If your input file is different, be sure to change the gulp.src('./src/css/*.scss') line to match the location where you scss files live. Same thing goes for the output. Change .pipe(gulp.dest('./static/css')) to match your desired output location. Make sure the head tag in your HTML points to this location for your css files. For instance, for me, I’m linking to /css/style.min.css in my HTML.
To run the Gulp task we created, use the following command:
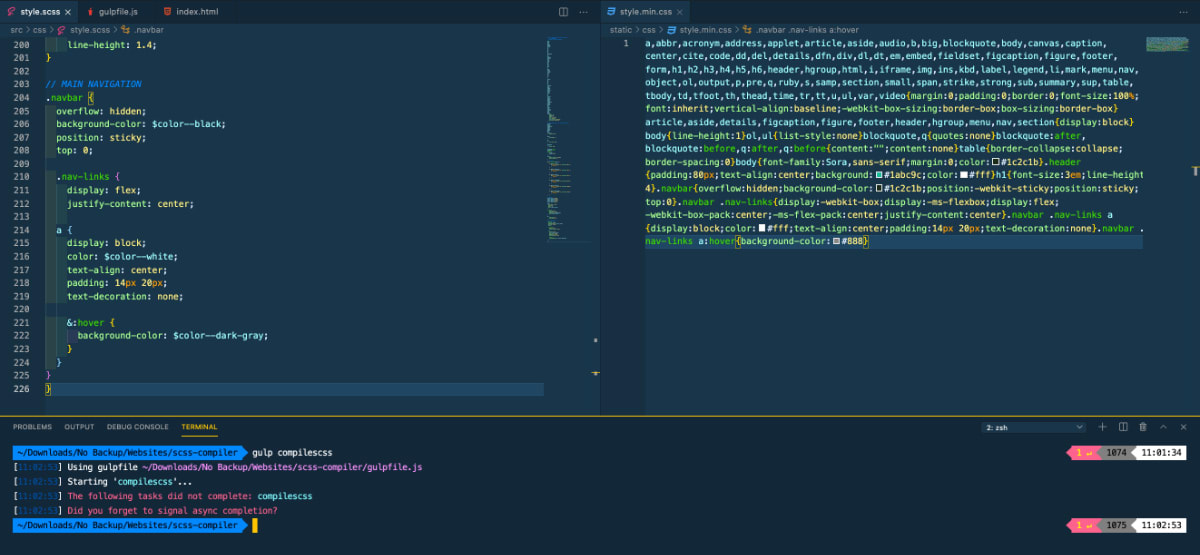
```shell gulp compilescss ```That will take all SCSS files in my src/css directory and run them through the pipeline, outputting them at static/css/*.min.css. Here’s a screenshot of the result. Notice how the SCSS includes nested elements, SCSS variables, as well as things that need backwards-compatibility like Flexbox. In the end, the CSS is minified, includes all the appropriate prefixes, and has been directly compiled from the SCSS.
But you can also create a watch task that will do this everything you save your SCSS file automatically. Replace your existing code in gulpfile.js with this code:
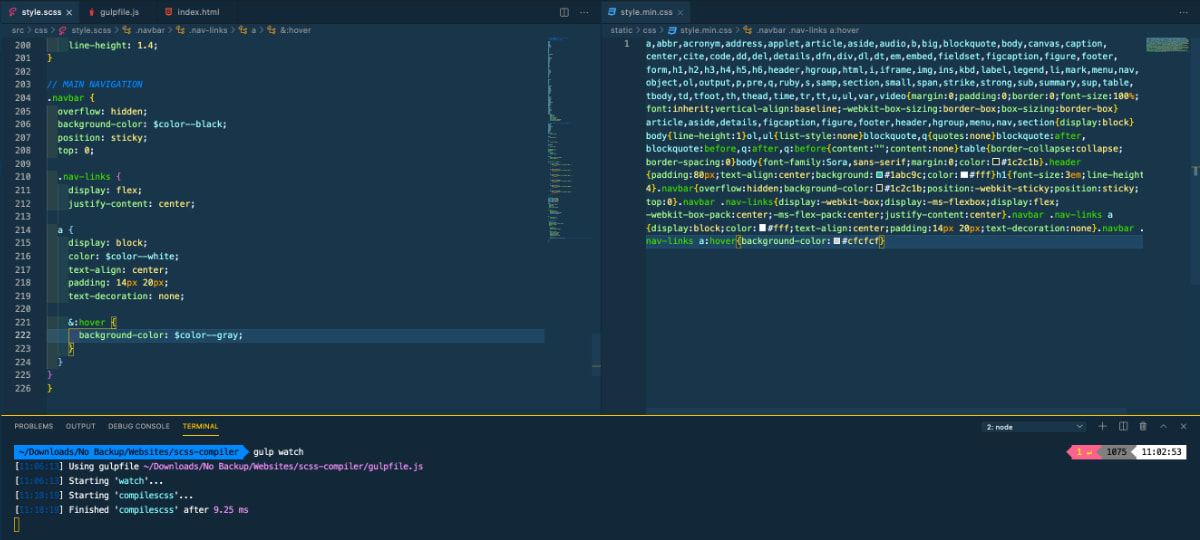
```javascript const gulp = require('gulp'); const sass = require('gulp-sass'); const prefix = require('gulp-autoprefixer'); const minify = require('gulp-clean-css'); const rename = require('gulp-rename'); async function compilescss () { gulp.src('./src/css/*.scss') .pipe(sass()) .pipe(prefix()) .pipe(minify()) .pipe(rename(function (path) { return { dirname: path.dirname + "", basename: path.basename + ".min", extname: ".css" }; })) .pipe(gulp.dest('./static/css')) }; gulp.task('watch',function(){ gulp.watch('./src/css/*.scss', compilescss) }); ```Notice that I changed it to an async function to remove the error we got above and created a gulp task below, telling it which file(s) to automatically watch and then passed it the function we want it to run on those files (our gulp task above).
Type this command in your terminal:
```shell gulp watch ``` The result should be something like this: Whenever you save your SCSS file, it will run the gulp command and send all SCSS files in your directory through your pipeline.
That’s it! If you have any questions, reach out.
# Git Commands https://chrispennington.dev/blog/git-commands A basic guide to regular git commands I always forget… I’m always forgetting basic git commands, so I figured I’d make a list here I can reference. Hopefully it’s a help to you, too! ## To clone a remote repo: 1. Navigate to local folder 2. Clone remote repo ```shell git clone {URL} ``` ## When making changes: 1. Make local changes 2. Add changes to staging area ```shell git add -A ``` 3. Commit changes to local repo ```shell git commit -m "message" ``` 4. Pull remote repo (to make sure no one has updated remote repo) ```shell git pull origin master ``` 5. Then push it to the remote repo ```shell git push origin master ``` ## Working with branches: 1. Create a branch ```shell git branch [name of branch] ``` 2. Checkout branch ```shell git checkout [name of branch] ``` 3. add, commit change to local branch ```shell git add -A ``` THEN ```shell git commit -m "message" ``` 4. commit push branch to remote ```shell git push -u origin [name of branch] ``` (just first time to push it to remote and link the two together) 5. in the future… you can just use ```shell git push ``` ## To merge… 1. Switch to master change ```shell git checkout master ``` 2. Pull from master to make sure we're up to date ```shell git pull origin master ``` 3. Merge branch ```shell git merge [name of branch] ``` 4. Push to remote ```shell git push origin master ``` 5. Check to see which things have been merged into master ```shell git branch --merged ``` ## To delete branch 1. Check to make sure it's merged (should show merged branch) ```shell git branch --merged ``` 2. Delete local branch ```shell git branch -d [branch name] ``` 3. Delete remote branch ```shell git push origin --delete [name of remote branch] ``` 4. Check everything ```shell git branch -a ``` (double check all local and remote branches are deleted) # ESV Bible Api Script for Raycast https://chrispennington.dev/blog/esv-bible-api-script-for-raycast I wrote a script that calls the ESV API using NodeJS and then copies the result to your system clipboard. It uses Raycast by default, but you could also adopt the script to work with another program or in another environment. I find regular need to quickly look up or copy and paste verses from the ESV Bible. Thankfully, the ESV API is available for free and easy to use. Using Raycast, I’ve created a script to automatically copy verses to my clipboard with a variety of formatting options. Here’s a preview:Note: Since writing this post, I’ve created an extension for the ESV API you can download for free from the Raycast store. You will still need your own ESV API key as I show below.
## Set up your ESV Account. In order to call the API, you need both a free account with esv.org and permission granted to use the API with your application. 1. Login to your ESV account. Go to [api.esv.org](https://api.esv.org), click the avatar, and choose **Sign In**.\ 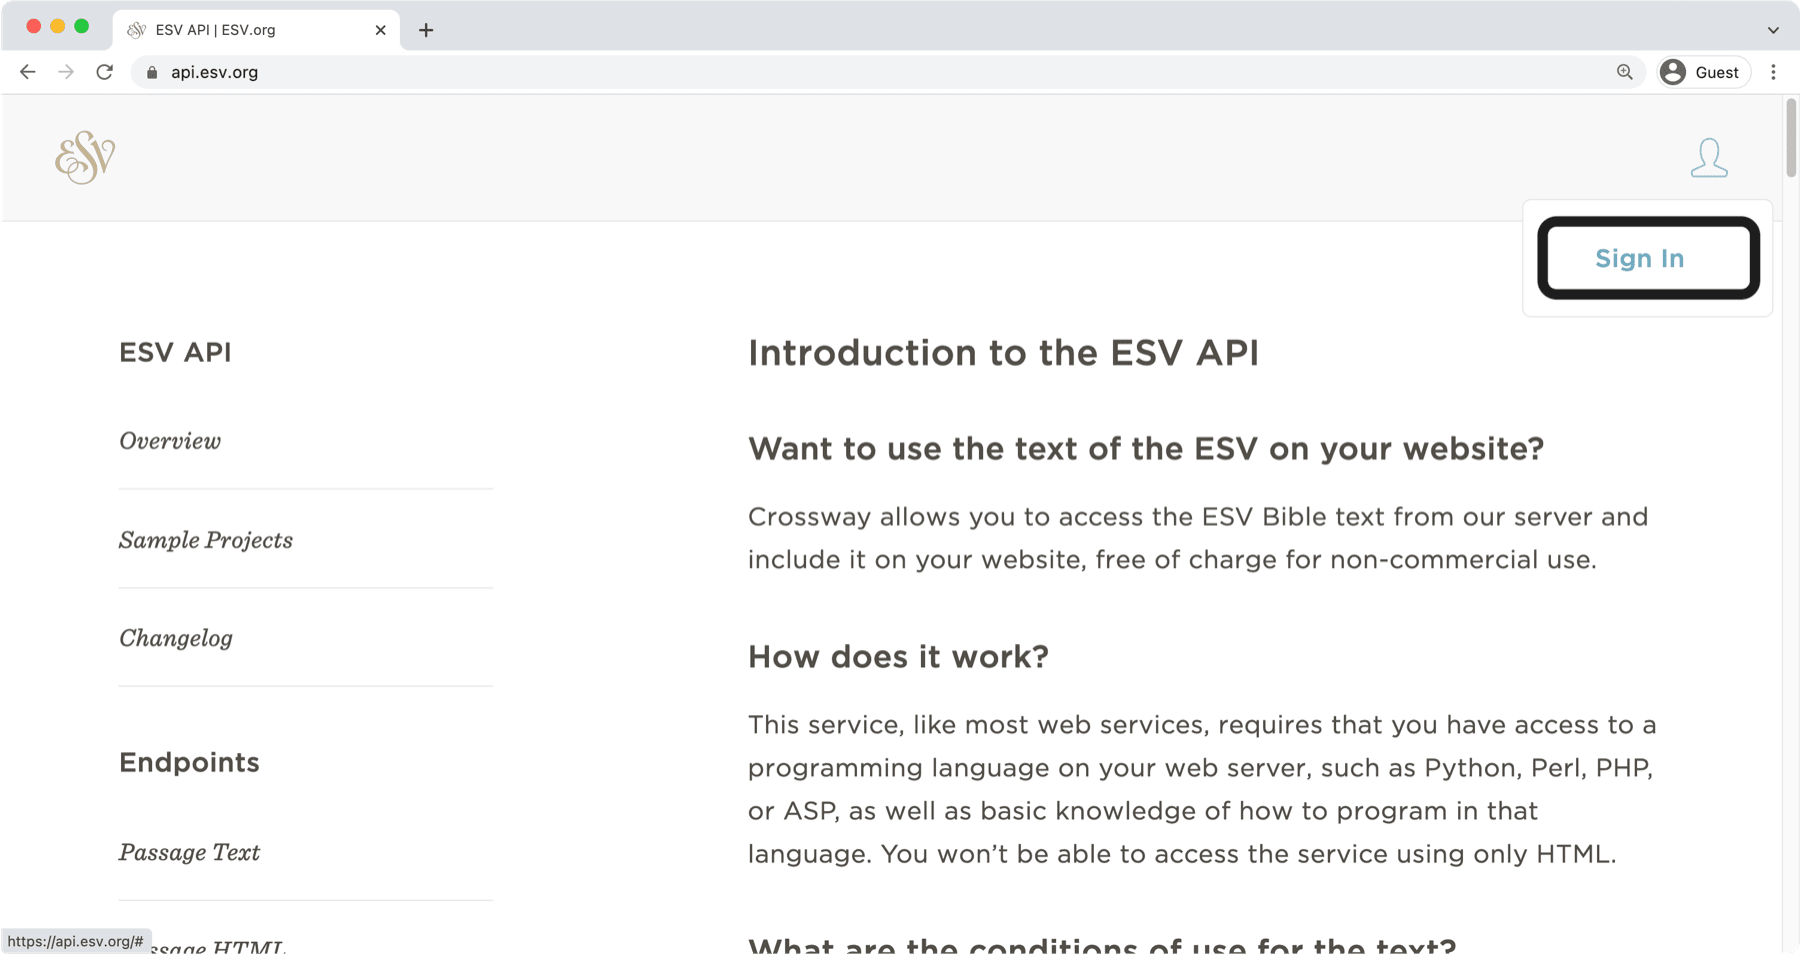 2. Sign in if you already have an account or click **Create account** if you need one.\  3. Click **Create an API Application** to request permission to use the API for your Raycast Script.  1. Provide details for your application. Here is an example. Depending on your needs, your application may require staff approval.  1. Once your application is approved, note your API key. You will need this to access the API. Note: Treat your API key like a password. After creating this tutorial, I deleted this key and replaced it with an new one … so don’t go trying to use mine here 😏.
If you need access to your API key in the future, you can find it by logging in, clicking the avatar, and choosing **My API Applications**. All your approved applications should show in the list. 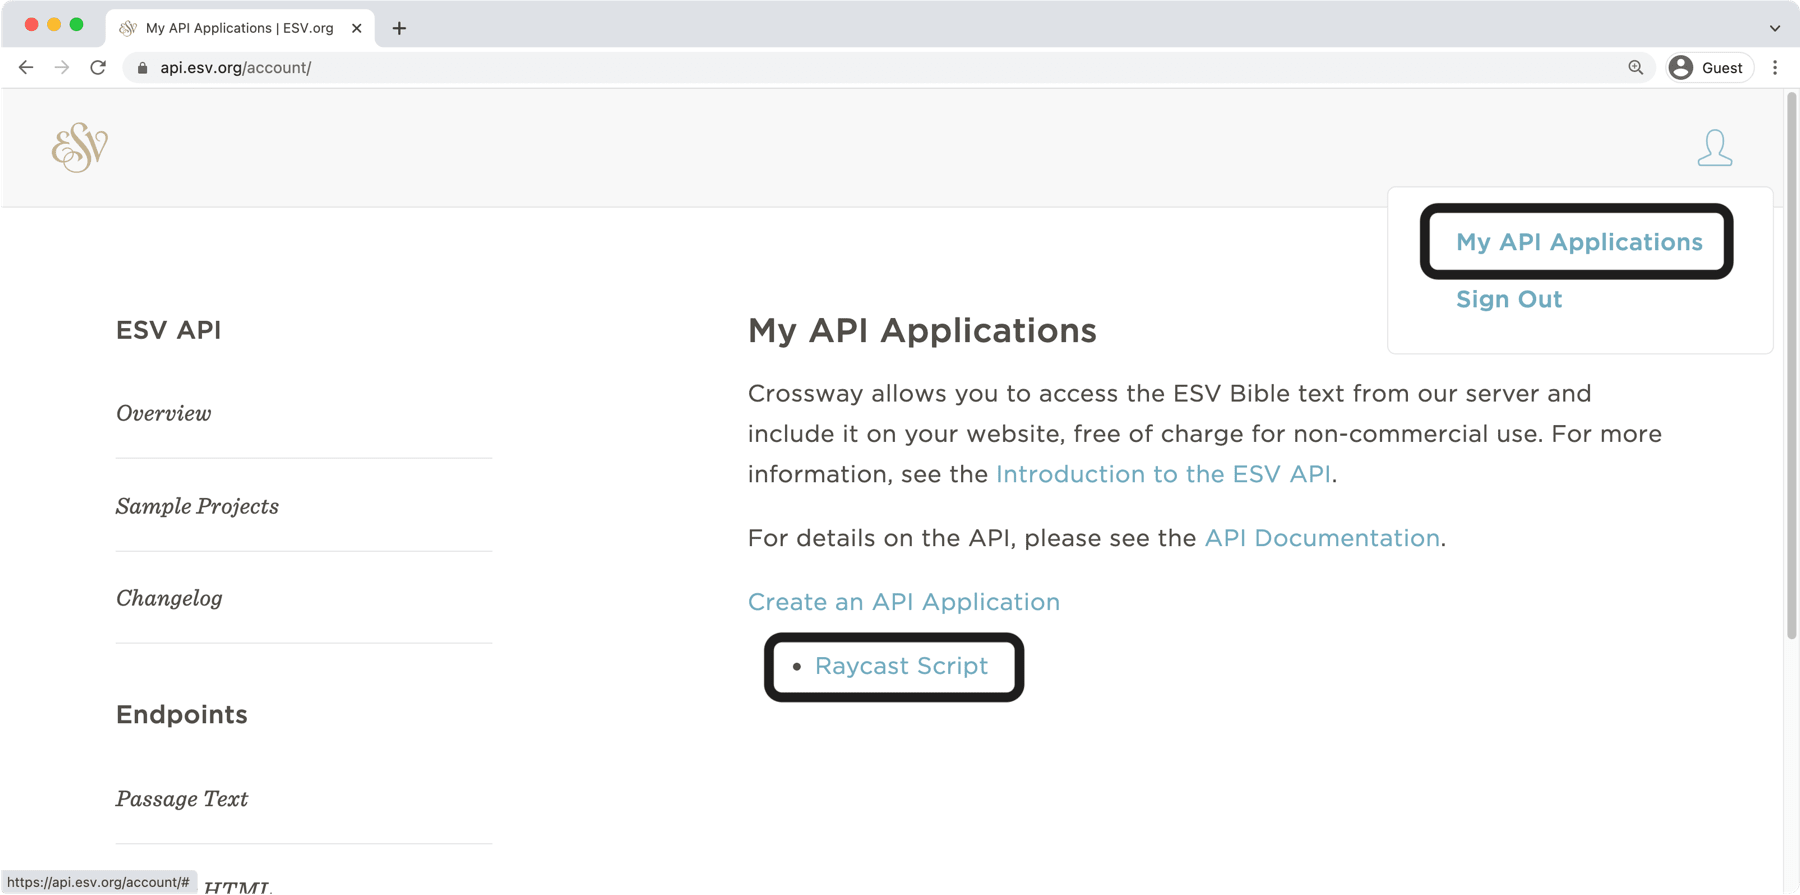 ## Download the Script files. You can find the script files for this tutorial on my GitHub account.Note: If you’re unfamiliar with GitHub, the easiest way to download all the files is by clicking the green Code button and selecting Download ZIP.
## Install NodeJS. I wrote the script using NodeJS, which is a free server side JavaScript environment (no, you don’t need to know what that means to run the script). To get NodeJS on your machine, go to [NodeJS.org](https://nodejs.org/en/) and download the LTS version of Node. Install it on your machine using normal program installation instructions. ## Set up the Script. ### 1. Install the dependencies. Open the folder you downloaded from GitHub using a code editor, like VS Code (You can [download it for free here](https://code.visualstudio.com/)). Next, open your Terminal and navigate to the folder. (If you’re using VSCode, just open the integrated Terminal from the main menu bar.) Run the following command to install the dependencies: `npm i` This will tell Node to install the dependencies you need for the script. It should look something like this:  ### 2. Add your API key. Next, create a new file in the folder called .env. This file will contain your API key. Add your API key to the file replacing my API key with your own.  ## Add the Script to Raycast. You’ll need to tell Raycast where to find your script. To do this, open the Raycast Extensions. 1. Open Raycast. 2. Open the Raycast preferences (⌘ + ,). 3. Open the **Extensions** tab. 4. Click the **+** icon and choose **Add Script Directory**.  5. Navigate to your directory and click **Open**. 6. Optionally, add an Alias (i.e., a shorthand in Raycast) or a Hotkey (i.e., globally invoke the script immediately with a keyboard shortcut).  ## Running the Script. To run the script: 1. Press your Raycast hotkey or open the Raycast menu and search for `ESV passage`. 2. Tab to the passage field and type in the passage you want to look up. 3. Add a desired format (optional) - All: default formatting from the ESV API - Some: removes some of the default formatting - None: removes all formatting (the default if you don’t specify a format) 4. Press the Enter key to run the script. ## Understanding / Modifying the Script I’ll include the full script file that does all the calling of the API with comments throughout if you want to better understand or modify the script.Note: Currently, iOS devices don’t display the following code block correctly—Sorry!
```javascript #!/usr/bin/env node // Required parameters: // @raycast.schemaVersion 1 // @raycast.title ESV Passage // @raycast.mode silent // Optional parameters: // @raycast.icon assets/esv--light.png // 👈 the icon that shows in light mode // @raycast.iconDark assets/esv--dark.png // 👈 the icon that shows in dark mode // @raycast.packageName esv // @raycast.argument1 { "type": "text", "placeholder": "Enter a Bible reference", "percentEncoded": true } // @raycast.argument2 { "type": "text", "placeholder": "none (default), some, or all styling", "optional": true } // Documentation: // @raycast.description Call ESV API to copy text to your system clipboard // @raycast.author Chris // @raycast.authorURL @cpenned on Twitter import dotenv from 'dotenv'; import fetch from 'node-fetch'; import clipboard from 'clipboardy'; // Load environment variables from .env file const result = dotenv.config(); if (result.error) { throw result.error; } // Get user inputs for passages and styling const passage = process.argv[2]; const style = process.argv[3].toLowerCase() || 'none'; // 👈 lowercase the user input so "All/Some/None" and "all/some/none" both work // Show optional parameters from ESV API at https://api.esv.org/docs/passage-text/ // 👇 these are all set to the opposite of the default values set by the API const nonDefaultStyling = { references: '&include-passage-references=false', verseNumbers: '&include-verse-numbers=false', firstVerseNumbers: '&include-first-verse-numbers=false', footnotes: '&include-footnotes=false', footnoteBody: '&include-footnote-body=false', headings: '&include-headings=false', shortCopyright: '&include-short-copyright=false', copyright: '&include-copyright=true', selahs: '&include-selahs=false', passageLines: '&include-passage-horizontal-lines=true', headingLines: '&include-heading-horizontal-lines=true', indentPoetry: '&indent-poetry=false', indentPoetryLines: '&indent-poetry-lines=0', indentDoxology: '&indent-psalm-doxology=0', indentDeclares: '&indent-declares=0', indentParagraphs: '&indent-paragraphs=0', }; // Define selections for personal style groupings // 👇 these are my preferred sets of params for each style group (i.e., all, some, none). You can change each to fit your needs. const styleGroups = { none: `${nonDefaultStyling.references}${nonDefaultStyling.verseNumbers}${nonDefaultStyling.firstVerseNumbers}${nonDefaultStyling.footnotes}${nonDefaultStyling.footnoteBody}${nonDefaultStyling.shortCopyright}${nonDefaultStyling.headings}${nonDefaultStyling.indentPoetry}${nonDefaultStyling.indentPoetryLines}${nonDefaultStyling.indentDoxology}${nonDefaultStyling.indentDeclares}${nonDefaultStyling.indentParagraphs}`, some: `${nonDefaultStyling.footnotes}${nonDefaultStyling.footnoteBody}${nonDefaultStyling.shortCopyright}${nonDefaultStyling.headings}${nonDefaultStyling.indentPoetry}`, all: '', // default styling from ESV API }; // Fetch passage from ESV API with user inputs, copy to clipboard, and notify user fetch(`https://api.esv.org/v3/passage/text/?q=${passage}${styleGroups[style]}`, { method: 'GET', headers: { Authorization: `${process.env.API_TOKEN}`, }, }) .then((response) => { if (!response.ok) { throw new Error('Network response was not ok'); } return response.json(); }) .then((data) => { clipboard.writeSync(data.passages[0].trim()); // 👈 get passage result, trim whitespace, and copy to clipboard console.log(`The passage is on your clipboard!`); }) .catch((error) => { console.error('There has been a problem with your fetch operation:', error); }); ``` # How Do You Write a Variable in JavaScript? https://chrispennington.dev/blog/how-do-you-write-a-variable-in-javascript Learn how to write JavaScript variables for beginners. I’ll cover three variable keywords, naming conventions, and variable values. As with any program, JavaScript tells the computer what to do step-by-step. Your instructions are full of values. How do you talk about a value in your program? You assign it a name. With your value bound to a name, you can reference it in your program. As in most programming languages, you bind a name to value with a what’s called variable statement. Generally speaking, variable statements have three items: ```javascript (1)KEYWORD (2)NAME = (3)VALUE ``` Here’s how the code may look in real life: ```javascript const learningTheBasics = true; ``` In the code above: 1. “const” is the special function KEYWORD 2. “learningTheBasics” is the variable NAME 3. “true” is the VALUE Let’s explore those one at a time.Note: Prefer a video version of this article? View the video on my YouTube channel.
## 1. Variable keywords. There are three different keywords used to declare a variable in JavaScript: *var*, *let*, or *const*. Any keyword you choose will declare a variable, but they behave differently. Generally speaking, I use *const* by default, *let* when required, and *var* … never. Let’s ignore *var* for now because you shouldn’t likely be using it. What’s the difference between *const* and *let*? - **const** stands for “constant” and cannot be reassigned a different value (in other words, it’s a way of permanently assigning a name to a value) - **let** can be reassigned a new value later in your program By using *const* as the default, it ensures you don’t accidentally overwrite a reassignable variable (i.e., *let*). If you try to reassign *const*, your program will throw an error. If you meant to reassign it, you can change the keyword to *let*; and if you didn’t want to reassign it, it’s a good thing you used *const*. 😏Note: I promised a brief explanation of var, so I’ll give that here. Var has been in the language since the beginning. It works just like the let keyword except that it is globally available anywhere in your JavaScript file. That may sound like a good thing, but it makes for a lot of bugs, as it’s easy to reassign a var variable unintentionally. Both const and let are block scoped, meaning you can limit how available they are to you in your code. If that doesn’t make sense, don’t worry. We’ll go over scoping later. For now, just use const by default and let if you need to reassign a variable (note: this is my preference and not a hard rule). One more thing: because var and let can be reassigned, some developers reserve the word “variable” for var and let. In that nomenclature, const isn’t a “variable,” but a “constant.” I usually call them all “variables” so if you hate that, learn how to write JavaScript and write a script that replaces “variable” for “constant” when applicable. 😉
## 2. Variable names. The name is sometimes called the “identifier”; it’s what you use to speak about the variable later in your code. Before we get crazy, let’s start with some basic rules. #### Variables cannot: - start with a number - be a reserved JavaScript word (there are [certain words](#reserved) the JavaScript interpreter reserves) - have a space between words So these would all be *invalid* variable names: ```javascript const 1stLearner = 'me'; // “1stLearner” starts with a number const var = 'variable'; // “var” is a reserved keyword const my name = 'Chris'; // “my name” has a space ``` #### Variables must: - begin with a letter (upper or lowercase), the dollar sign symbol ($), or the underscore symbol (_). - only contain letters, numbers, underscores, or dollar signs #### Best practices for naming variables How should you name variables? Here are the generally-accepted best practices: 1. Use “camelcase” to name variables. Camelcase means the variable name starts lowercase, but every additional word in the name starts with an uppercase letter. Because variable names *are* case-sensitive, the most important practice is to be consistent. Here’s an example *without* camelcase: ```javascript const listofnamesfromserver = ['jim', 'joe', 'pearl', 'pam'] ``` Here’s the same example *with* camelcase: ```javascript const listOfNamesFromServer = ['jim', 'joe', 'pearl', 'pam'] ``` Camelcase makes variable names easier to read.Note: There’s one generally-accepted exception: true constants. If you follow my suggestion above (that you should use *const* by default), most of your variables will be *const* declarations, even though they don’t *have* to be constants in most instances. When people follow this practice, they usually fully CAPITALIZE variable names that *must* be constants for the program to work (e.g., you couldn’t change it to “let” without breaking your program).
2. Optimization and speed is important, but so is upkeep and readability. While “x” is a fine name for a variable, it doesn’t tell you anything about what the variable points to and thus requires more work to understand. Later on, you can use tools to shorten and optimize your variables upon build. For now, be very descriptive.Here are most of the reserved JavaScript words: as, async, await, break, case, catch, class, const, continue, debugger, default, delete, do, else, get, if, import, in, instanceof, let, new, null, of, return, set, static, super, switch, target, this, throw, true, try, typeof, var, void, while, with, yield, enum, implements, interface, package, private, protected, public.
## 3. Variable values. Variables point to values and those values can be most any data type in JavaScript. The next lessons will explain data types, so for now, I’ll simply list the seven types: - **String:** surrounded by ``, '', or "" - **Number:** a number (either an integer or decimal point) - **Boolean:** true or false (not surrounded by ``, '', or "" —> because that would be a string) - **Null:** absence of a value - **Undefined:** a special word meaning a variable or object is initialized but has no value - **Symbol:** a special value that always returns a unique identifier - **Object:** collections of data usually surrounded with { } (everything in JavaScript is technically an object)Note: The assignment operator (i.e., how you assign the value to the variable) is a single equals sign. You can also update let or var variables with the equals sign as shown below.
## How to Declare a Variable To pull everything together, you declare a variable how we started: ```javascript (1)KEYWORD (2)NAME = (3)VALUE ``` There’s one more difference to note here between *const* and *let*: - With *const*, you **must** provide a value - With *let*, you **can** merely initialize it (e.g., “let firstName;”) and then provide a value later using only the name (because *let* can be updated later); ```javascript const firstName = 'Jenny' ``` This 👆 uses *const*, and *must* be assigned a value when you initialize it (e.g., you *cannot* merely type **const firstName;** because you can’t update a *const* variable later.). ```javascript let firstName; firstName = 'Jenny' ``` This 👆 first initializes a *let* variable named *firstName* and then later updates the value by referencing only the name (e.g., *firstName*). # How Focus Led Me To YouTube https://chrispennington.dev/blog/how-focus-led-me-to-youtube My YouTube channel just hit 30,000 subscribers but no one was ever supposed to see it. Now more than ever, I’ve had to be intentional about my focus to keep the main thing “the main thing.” Here’s my story as it currently reads. Having just hit 30,000 YouTube subscribers, I wanted to take a few moments to capture my journey. As a starting point, I never expected anyone to watch and I never intended the channel to “be a thing.”Note: I’m writing this post mostly as a way to capture my current thinking and process my plan aloud. So, admittedly, the post is mostly for me, but I hope you’ll find it helpful, too!
## Learning to Code In May 2020, the world was in upheaval and I suddenly had a lot more time on my hands. A non-profit I was working with needed a website, so I told them I’d see what I could do. I’d built a few Wordpress and Squarespace sites in the past using templates, but I’d never built anything from scratch. With the extra time, I thought it would be fun to make something more custom. My brother is a skilled web developer, so I asked for his help and he directed me to learning HTML and CSS as a starting point. He told me something that’s stayed with me since then: “You’ll either be bit by the coding bug or you won’t. There’s not a lot of in-between.” I was bit hard and started building whatever I could get my hands on. For 6 months, I coded nearly every morning and evening. My brother had recommended trying to recreate websites I liked with just HTML and CSS. Building real things forced me to confront what I didn’t know or understand. And these real-world projects motivated and spurred on more learning. ## Moving to JavaScript In December 2020, I’d become relatively comfortable with HTML and CSS. While I still had a lot to learn about both, I was ready for the next step: JavaScript. This time, I called a friend from grad school. We were in the same program and studied a lot together once we found that we had a similar learning style and approach (in fact, he was the only person I ever studied with!). Several years before, he’d started learning web development and now owned a company that built websites for small businesses. I asked him where I should start with JavaScript and he recommended [Wes Bos’s JavaScript for Beginner’s course](https://beginnerjavascript.com/). I bought the course and fell in love with Wes’s style. ## The Step to YouTube By January 2021, I was neck-deep in JavaScript and started listening to the [Syntax Podcast](https://syntax.fm) with Wes (and Scott Tolinski). Early on, I heard Wes say something like, *“The best way to test your knowledge is to teach it. I often record myself talking through code because it forces me to explain what’s going on. Sometimes I’ll post it; sometimes I won’t. But nothing exposes my lack of understanding like forcing myself to teach code.”* Shortly afterwards, I was talking with another brother who was studying Computer Science in college. He was feeling stuck and frustrated by the slog of programming. I shared what Was said and encouraged him, “Just start recording yourself teaching what you’re learning in class. I think it’d really help you.”[^1] When I hung up the call, I thought, “I should do that, too!” For nearly three years I’d worked part-time for a company as a User Education Specialist, writing articles and recording videos explaining their software. I had the gear (i.e., microphone, screenrecording gear, etc.) and the basic editing skills. So that week in February 2021, I recorded and uploaded my first video to YouTube. I told no one. I didn’t open analytics. I just kept learning and recording. ## What Grew the Channel I remember getting an email about my first sub and wondering how anyone found me. Somehow the YouTube algorithm landed me in more feeds, but it was slow growth. About 4 months in, I finally mentioned to my wife that I was recording and posting coding videos.[^2] In July 2021, Shaun Pelling from the [Net Ninja YouTube Channel](https://t.co/CbiGQF2eH5) contacted me via Twitter. He’d seen my videos and wanted to know if I’d be interested in doing some guest content on his channel. I was completely shocked! *Should I tell him I’d only been coding for a year as a hobby!* I think I gained around 1,000 subscribers in the first 12 hours after he posted the video. Since then, I’ve been on a steady growth trajectory. I’ve never had a video “blow up,” and I’ve never had a bigger spike than that first video with Shaun. For a while now, I’ve stayed steady at around 40 new subscribers a day. It’s very fair to say that without Shaun, you wouldn’t be reading this post. ## The Goal of My Channel This story returns me to the title of this post: how focus led me to YouTube. I had one goal: *learning to code*. I wasn’t trying to create a channel, be an influencer, or make money (not that any of those would be wrong). Since starting the channel, I’ve kept my head down and continued to learn. But this approach has led to a lot of questions: - Should I be posting more often? - Should I focus on more popular topics? - Should I try to get sponsors? - Should I try to get more subscribers? - What area of web development should I focus on? While these questions can have a scattering effect, they can also force you to define your focus. Since my channel began, my focus has been singular: learning to code by teaching through my code. I don’t think I’ve ever created a project “just for the channel.” I’m always teaching through something I built or designed for myself, a friend, or in my learning process. That being said, for the better part of a year, I’ve fought internal pressures to optimize for subs, money, and growth. I’m fairly confident I could get a lot more subscribers or views if I changed my approach. As a start, I could: - Choose more popular topics - Keep videos shorter and punchier (think Fireship) - Post more often - Add more interesting visual effects and animations - Pursue large sponsors - Pursue collaborations The trouble with all of these “optimizations” is that they would take me away from coding or change the time allotment or nature of my learning. I could spend 4 hours adding fancy animations on a video and gain 2000 more views, but then I’d have less time to learn how to code that week. I could record more videos, choose more of-the-moment topics, or compress my videos, but it would fight against my purpose. The power of my channel for my own journey has been this path: 1) learn something I want to learn 2) build it 3) record myself explaining it.[^3] To change my channel content or frequency would almost certainly require changing my learning path or making the two paths different. I don’t currently have capacity to both continue learning how to code and also find time to record something entirely different for my channel. ## The Future of Coding in Public I recently [heard a podcast episode](https://www.relay.fm/focused/182) with Nathan Berry, founder of ConvertKit. He noted three essentials for getting lucky: 1) relentlessly showing up, 2) continuously learning, and 3) teaching what you’re learning. My channel has been a stroke of luck, but it’s most certainly involved these three prerequisites. There may be a day when my knowledge or time allows me to separate out my learning from the channel. For now, however, I’ve decided to stay true to my original intention. I find the pattern of learning and teaching so powerful and value it more than the growth of my channel.[^4] *So, what will I be teaching through?* I’m currently building out several Astro websites, so that will likely be my focus for the next bit. That being said, I still have a lot to teach through. Many of the things I’m learning are still in early stages.[^5] Now that I have a few more people watching me, I try to wait to teach through something until I sense I have a good grasp of the topic. I’m not quite ready to explain many of these new-to-me languages, frameworks, or services in a way that’s helpful for others. I’m excited to see how we continue on this journey. I would love to more openly surface my position as a learner, but don’t want to make the channel content about me. I’m still thinking through how to make it clear that I’m a learning without either undermining my teaching (i.e., making it sound like I don’t have a clue what I’m talking about) or making the channel about me. Finally, *thank you!* People have been so kind to me on YouTube and I’ve grown so much both teaching and interacting with your suggestions for improvement. I’ve learned so much about coding from your comments and suggestions over the years and can’t wait to see what we can continue learning together. *Always a learner. Never the expert.* [^1]: In that same conversation, I think I asked him to explain GitHub and commits to me, because I didn’t understand what they were! [^2]: To this day, we don’t talk about the channel and I think only two other friends in life even know I have a channel. [^3]: I’ll often change out text and images on a video to disguise the original project, but it’s always something I’m building for myself first. [^4]: In fact, the times I’ve been most frustrated with my channel have been times of growth. [^5]: For example, I’m currently still actively learning React and TypeScript. I’ve been using Firebase for nearly a year along with some MongoDB and other database solutions. And I’m building real things with them! For instance, this last week I spent ~15 hours building out a backend admin dashboard for a project using these tools. I’ve done a few small React videos on my channel, but I don’t think I’ve ever shared anything TypeScript or Firebase. I’m also exploring a bunch of the new CSS and JS tools or APIs and have been actively learning the new tools in Figma. So much to learn! # How to Create and Use Multiple VSCode Profiles https://chrispennington.dev/blog/how-to-create-and-use-multiple-vscode-profiles VSCode profiles are a great way to keep your work and personal projects separate. In this post, I'll show you how to create and use multiple VSCode profiles. I have personal preferences for how I author code. Like anyone, I’m opinionated my coding experience. I prefer using ligatures, cursive fonts for comments, VSCode themes, and more. The problem is that I am always switching between personal/client projects and recording tutorials on [my YouTube channel](https://www.youtube.com/c/CodinginPublic). I don’t want to have to change my VSCode settings every time I switch between projects, so it’s mostly been an unhappy compromise where neither my personal coding environment nor my tutorial coding environment is ideal. ## TL;DR 1. Create a settings.json file for each non-default profile in a data/User directory. 2. Open a directory with VSCode CLI (with the `--user-data-dir` flag pointing to your profile’s data directory).Skip ahead to:
Note: If you’re an ohmyzsh user, you can use take in the place of mkdir to create and cd into the newly-created directory at the same time.
Note: If you’re on macOS and haven’t first enabled launching VSCode from the command line, the command above will not work. See below for instructions.
Add your desired settings to the file. Here’s an example I found from [@avanslaars](https://twitter.com/avanslaars) available [here](https://github.com/avanslaars/code-profiles/blob/master/egghead/data/User/settings.json): ```json { "editor.fontFamily": "JetBrains Mono, Dank Mono, Operator Mono", "editor.tabSize": 2, "editor.quickSuggestions": false, "editor.suggestOnTriggerCharacters": false, "editor.fontSize": 16, "editor.fontLigatures": false, "editor.multiCursorModifier": "ctrlCmd", "editor.formatOnPaste": false, "editor.formatOnSave": true, "editor.tabCompletion": true, "prettier.singleQuote": true, "prettier.semi": false, "prettier.trailingComma": "none", "prettier.arrowParens": "avoid", "workbench.colorTheme": "Night Owl", "javascript.validate.enable": false, "window.zoomLevel": 1.25, "editor.cursorBlinking": "solid", "editor.cursorStyle": "line", "editor.minimap.renderCharacters": false, "terminal.integrated.fontSize": 14, "explorer.openEditors.visible": 0, "workbench.settings.useSplitJSON": false, "workbench.settings.editor": "json", "workbench.sideBar.location": "right" } ``` ## How to use a VSCode profile When I open VSCode normally, it uses my default personal profile. To use a different profile, you can open VSCode from the command line with the `--user-data-dir` flag pointing to the profile’s data directory. For me that looks like this: ```shell # code --user-data-dir PROFILE_DIRECTORY DIRECTORY_TO_OPEN> code --user-data-dir ~/vscode-profiles/screenrecording/data ``` VSCode should open your desired directory with the settings from your profile’s settings.json file.Note: If you’re on macOS and haven’t first enabled launching VSCode from the command line, the command above will not work. See below for instructions.
## Set up an alias for your profile If you’re going to be using a profile often, you can set up an alias to make it easier to open. I’ve set up an alias for my `screenrecording` profile in my .zshrc file. 1. Open your .zshrc file. ```shell code ~/.zshrc ```Note: I’m assuming you’re using zsh as your shell. If that’s not the case, your alias setup may look different than shown here.
2. Add the following to the file. ```shell # alias NAME_OF_ALIAS="code --user-data-dir PROFILE_DIRECTORY" alias screenrecording='code --user-data-dir ~/vscode-profiles/screenrecording/data' ``` 3. Save the file and restart your terminal (or source the file with `source ~/.zshrc`). Now, you can use your alias to open VSCode with your profile’s settings. ```shell # NAME_OF_ALIAS DIRECTORY_TO_OPEN screenrecording . ```Note: See this VSCode support article for more help.
# How to Fix Logitech MX Master 3 Not Scrolling on Mac https://chrispennington.dev/blog/how-to-fix-logitech-mx-master-3-not-scrolling-on-mac When I transitioned to an M1 Mac, my Logitech MX Master 3 started acting oddly—sometimes not scrolling or letting me use the additional buttons or features. Here’s how to fix it. If your Logitech MX Master 3 acts oddly on macOS, you can fix it by killing the Logi Options Daemon process. ## Restart the Logi Options Daemon from Activity Monitor 1. Open the Activity Monitor. 2. Locate the “Logi Options Daemon” process. 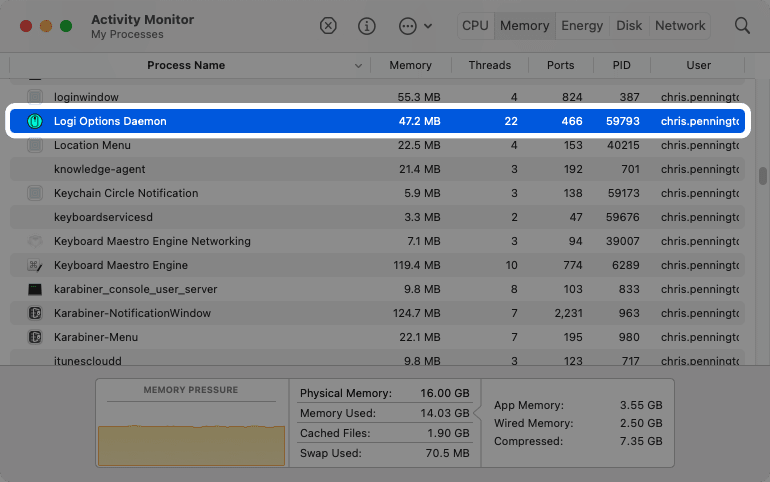 3. With it selected, click the “Kill” icon (the × in the navigation bar) and confirm you want to quit the process. In my experience, this solves the problem every time. ## Restart the Logi Options Daemon from the Terminal Alternatively, you can restart the Logi Options Daemon from the Terminal. 1. Open the Terminal. 2. Typekillall LogiMgrDaemon
Note: Access the full docs for NPM Check Updates.
## 2. Run NPM Check Updates. cd to a directory with your project and run the following command. ``` npx ncu ``` This will return a list of packages that need to be updated. Here’s what it looks like: ``` [====================] 15/15 100% @notionhq/client ^0.4.11 → ^0.4.13 node-fetch ^2.6.6 → ^3.2.0 gulp-autoprefixer ^7.0.1 → ^8.0.0 gulp-imagemin ^7.1.0 → ^8.0.0 gulp-sass ^5.0.0 → ^5.1.0 gulp-terser ^2.0.1 → ^2.1.0 sass ^1.35.2 → ^1.49.7 ``` The existing version is on the left and the latest version is on the right. NPU maintains semantic versioning policies, so you can quickly identify patches, minor updates, or major updates that need fixing.Note: In semantic versioning, the number on the right stands for patches (bug fixes), the number in the middle stands for minor versions (new features added in a backwards compatible manner), and major versions (new features added in a breaking manner). So … MAJOR.MINOR.PATCH.
## 3. Update Patches. First, I update all patches. Assuming the package maintainers are following semantic versioning, this shouldn’t break anything. ``` npx ncu -u -t patch ``` Run `npm i`, ensure everything is still working, and commit the changes (so I can revert if necessary). ## 4. Update Minor Versions. Next, I update all minor updates. Again, assuming the package maintainers are following semantic versioning, this shouldn’t break anything. ``` npx ncu -u -t minor ``` Run `npm i`, ensure everything is still working, and commit the changes (so I can revert if necessary). ## 5. Update Major Versions. Finally, I update all major updates. Before you update these, you should read the release note docs to see how the new version will affect your project. Once you know how the updates will affect your code, update each major change in a separate commit. With NCU, you can filter for a specific package by using the `--filter` or `-f` flag. So in this case, let’s say I’m starting with node-fetch. I’d type the following command: ``` npx ncu -u -f node-fetch ``` Run `npm i`, ensure everything is still working, and commit the changes (so I can revert if necessary). Then proceed to the next package to the next major version. # Hugo Setup https://chrispennington.dev/blog/hugo-setup A basic guide to setting up a Hugo site with GitHub and Netlify. ## Start my Hugo Site 1. Open terminal. 2. Change directory to desired location (e.g., to go to desktop, type `cd ~/Desktop`) 3. Hugo build command: `Hugo new site [sitename]` 4. Open Hugo in VS CodeNote: This guide assumes you’ve already installed Hugo globally on your machine.
## Initial Customizations ### 1. Initial repo Open the terminal inside VSCode and type the following command to initialize a local repo: ```shell git init ``` ### 2. Config.toml file Make changes to the config.toml file in VS Code. 1. Change the baseURL to your URL 2. Change Title to your Title 3. Add this code so I can use markdown like I'm used to… ```toml [markup] defaultMarkdownHandler = "goldmark" [markup.goldmark] [markup.goldmark.renderer] unsafe = true ``` ### 3. Add a css doc 1. Under the **static** folder, add a new folder called "css" 2. Add a file called "style.css" ### 4. Add a head doc 1. Under the **layouts** folder, add a new folder called "partials" 2. Add a file called "head.html" 3. Add the following code ```html {{ $title := .Site.Title }}Next Post: “How Do You Write a Variable in JavaScript?”
# Introduction to Terminal Commands https://chrispennington.dev/blog/introduction-to-terminal-commands When you’re first learning web development, the terminal can intimidating. Once you grasp the basics, however, you can move much more efficiently for most tasks through the command line. This post will introduce you to basic command line commands. This post will introduce you to basic command line commands. I’ll keep explanations short so this acts as more of a cheat sheet.Note: I’m assuming you are running a zsh shell. I’ve also installed oh my zsh, although most of the commands below do not rely upon it. For help setting up your terminal, see my video overview here .
## Navigating Files and Folders These basic commands help you move around your system. -pwd: Prints the current working
directory.
- cd: Change the current working
directory.
- .: Current working directory
(oh-my-zsh).
- ..: Parent working directory
(oh-my-zsh).
- ...: Grandparent working directory
(oh-my-zsh).
- ls: Lists the contents of the current
working directory.
- -: Toggle to the previous directory
(oh-my-zsh).
- code .: Opens the current working
directory in VSCode.
- open .: Opens the current working
directory in the Finder (use
explorer .
for Windows).
## Creating and Deleting
- touch: Creates a new file (follow the
command with the file name and extension).
- mkdir: Creates a new directory
(follow the command with the folder name).
- mkcd or
take
: Creates a new directory (follow the command with the folder name) and changes
to it (oh-my-zsh).
- rm: **_Permanently_** deletes a file
(follow the command with the filename).
- rm -r: **_Permanently_** deletes a
directory (follow the command with the directory name).
Note: For deleting, I strongly recommend the trash mdn package below, as it will move deleted files to your trash can / recycle bin.
## Searching and Repeating Terminal Commands - Tab: With zsh, you can start typing any directory and press the Tab key to autocomplete. If multiple options fit the search, you can press the Tab key again to cycle through them (you can also use the arrow keys to navigate other options). - ↑: Press the up arrow key to go to the previous command (continue pressing the up arrow key to go to the previous command). If you remember the beginning of the command, start typing and then press the up arrow key to show previous commands that match. - ctrl + r: Press the ctrl key and then the r key to search previous commands. - &&: Chain commands together with the && operator. For instance,
npm install && npm run build
will install the dependencies and then run the build command.
- man: You can open the terminal manual
pages for any command with the
man
command followed by the command. For example,
man ls
shows all possible flags available with the
ls
command. Press q to exit man pages.
## Cancel, Stop, and Clear Commands
- ctrl + c: Cancel current command.
- ctrl + l: Clear previous terminal outputs.
## Common Terminal Interface Commands
- cmd + t: Open a new terminal tab.
- cmd + w: Close current terminal tab.
- cmd + d: Open horizontally split terminal tab.
- cmd + shift + d: Open vertically split
terminal tab.
Note: I recommend Hyper, a cross-platform terminal with tons of customizations, themes, etc. For macOS users, I’d strongly recommend Warp, a new-ish modern terminal app. For more on Warp, see my video overview on Warp. For help setting up your terminal, see my video overview here.
## Helpful Custom Terminal Features ### Install z.sh for quick navigation. Once configured, typingz followed by a shorthand for a directory to quickly cd to that directory.
1. Save this [z.sh file](https://github.com/rupa/z/blob/master/z.sh) at the root of your computer.
2. Open your .zshrc file and add the following line to the end of the file: . ~/z.sh.
3. Use your terminal like normal.
Once you’ve established patterns of going to directories, you can use the z command to quickly go to those directories. For example, if you have a folder at ~/Documents/Blog, z.sh will learn your pattern of going to that directory and will automatically go there when you type z blog.
Note: This script requires Oh My Zsh. Learn more at the Z GitHub repo.
### Install the Trash CLI By default, when you userm to delete a file/folder, it will permanently and irrevocably delete the file/folder. This action can both be inconvenient if you accidentally delete something you later want, but it can also be dangerous (it’s easy to delete whole sections of your hard drive).
The trash cli replaces this default behavior by moving deleted files to your trash can. The trash cli works with both bash and zsh.
1. Open your terminal to any directory.
2. Type npm install --global trash-cli and press enter.
3. Once installed, use trash followed by a file or folder to move it to the trash can/recycle bin.
The docs suggest the following:
Add the line alias rm=trash to your .zshrc or .bashrc file to ensure you always safely delete files: rm unicorn.png.
Note: If that doesn’t make sense, add this line anywhere in
your .zshrc file: alias rm=trash. See
the Trash CLI repo for
more details.
Note: Thanks to Chris Coyier of CSS for pointing me to Adrian Roselli’s embed code. I’m merely adopting and tweaking Adrian’s work.
Using the srcdoc property on the native iframe element, you can create a custom poster for the video using the thumbnail image connected to the YouTube video. Not only does this little trick prevent the video from loading on page load, but it also makes for a more customized experience. Note two variables you’ll need to swap out in the code I have below: - {{ YOUTUBE-ID }} (used 3x) - {{ YOUTUBE-TITLE }} (used 2x) ```htmlNote: YouTube offers a few different thumbnails. If you want something larger or smaller than what I’ve used here, here are the other available options:
default (120×90)mqdefault (320×180)hqdefault (480×360) 👈 (what I used)sddefault (640×480)maxresdefault (1280×720)Note: Per Hugo’s documentation, custom shortcodes are .html files and must be placed in the layouts/shortcodes directory.
```html {{ $ytid := .Get 0 }} {{ $title := .Get 1 }}Note: Per Hugo’s documentation, custom partials are .html files and must be placed in the layouts/partials directory.
```htmlNote: See the Intl.ListFormat MDN docs for more information.
## Customize the output You can change up the output with several optional arguments. ### 1. locales Javascript uses locale codes to determine how to format the string based on the locales argument. If you’re an English speaker, your most likely reason for changing from your default local parameter is if you have a preference about the Oxford Comma. (It’s the comma that separates the last two items in a list.) - `en-US`: jim, joe, pearl, and pam (Oxford comma) - `en-GB`: jim, joe, pearl and pam (no Oxford comma) ### 2. options You can pass an object as a second argument with as many as three different options: - localMatcher: choose which locale matching algorithm to use ('best fit' is the default) - type: 'conjunction' (default), 'disjunction', or 'unit' - style: 'long' (default), 'short' (works only with unit type), or 'narrow'(works only with unit type)Note: The options are passed in as strings … so { type: 'conjunction'}.
I’ll let you read [the MDN docs](https://developer.mozilla.org/en-US/docs/Web/JavaScript/Reference/Global_Objects/Intl/ListFormat/ListFormat) for a full explanation, but I think I’ll mostly reach for the type option. - type: conjunction (returns "and" — the default) - type: disjunction (returns "or" — the default) ```js new Intl.ListFormat('en-US', {type: 'conjunction'}).format(['jim', 'joe', 'pearl', 'pam']) // output: 'jim, joe, pearl, and pam' new Intl.ListFormat('en-US', {type: 'disjunction'}).format(['jim', 'joe', 'pearl', 'pam']) // output: 'jim, joe, pearl, and pam' ``` ## Best practices It seems like the best approach is to create a new formatter object and then reference that object when you need an array formatted. ```js const formatOR = new Intl.ListFormat('en-US', {type: 'disjunction'}); ``` You’d then call theformat method on that object with any array(s) you want formatted.
```js
formatOR.format(['jim', 'joe', 'pearl', 'pam']);
// output: 'jim, joe, pearl, and pam'
```
# Pagefind: Static Search for Astro Sites
https://chrispennington.dev/blog/pagefind-static-search-for-astro-sites
Pagefind is a new static site search tool built in Rust and ideal for Astro sites.
[Pagefind](https://pagefind.app) is a new fully static search library by the amazing team over at [CloudCannon](https://cloudcannon.com).
It’s very fast due to a few factors:
- built in Rust (what isn’t these days!)
- splits the search index into chunks
- loads only required chunks per search
By default, Pagefind includes:
- a default UI
- multilingual support
- filtering and searching
- a full API to roll your own custom search
- customization options for functionality and styling
It’s a perfect match for Astro.
## Installation
### Install package
You can either install it, or just run everything through npx. I'll install it locally to my project.
Install command:
`npm i -D pagefind`
### Add head tags
Remember to add “is:inline” in Astro to tell Astro to not bundle the script.
```html
```
We’ll remove these later when generating our own UI.
## Usage
Pagefind includes a built-in UI, which you can customize.
### Add the Built-in UI
Create a Search.astro component and add the following:
```html
```
Note: If using ViewTransitions, add a transition:persist directive to the div.
Note: Since the linked css and js reference your build folder, dev mode will throw errors, as it’ll look into your public folder. So I’d recommend copying the generated pagefind directory to your public folder after it’s generated. You can modify the build script to the following: astro check && astro build && pagefind --site dist && cp -r dist/pagefind public/. Astro will use the pagefind data from your last build during dev mode.
Note: You can also add individual elements as metadata to be indexed. Learn more about adding metadata to your search index.
### Set a custom search weight Pagefind an rank any indexed item from `0.0` to `10.0`. Here are the default rankings. | Element | Ranking | | ------------------ | ------- | | `h1` | 7.0 | | `h2` | 6.0 | | `h3` | 5.0 | | `h4` | 4.0 | | `h5` | 3.0 | | `h6` | 2.0 | | All other elements | 1.0 | Add custom ranking with the `data-pagefind-weight` attribute, providing the rank as the value. ```htmlThis is very important and should be ranked higher.
```Note: Weightings are ranked using a quadratic scale, so a ranking of 2.0 will have roughly 4 times the impact of standard text, and a weighting of 10.0 will have roughly 100 times the impact.
Note: For the full defaults for customizing the default UI, view the Default UI config options.
## So much more… The API is quite robust! It comes with out-of-the-box support for: - [multilingual search](https://pagefind.app/docs/multilingual/) - [filtering](https://pagefind.app/docs/filtering/) - [sorting](https://pagefind.app/docs/sorts/) Each can be customized entirely. And because Pagefind provides access to the underlying APIs for searching, their NodeJS API, the Search API, and more, you can get as custom as you want! # Predictability is a Superpower https://chrispennington.dev/blog/predictability-is-a-superpower If you can predict how long tasks take you, it gives you a big advantage in daily life. What is productivity? Most good books on productivity eventually say something like, "Productivity is accomplishing what you intended to do." Ultimately, the skill I find myself wanting more and more is the ability to predict how long a task will take. Think of all the advantages: - You would never overcommit yourself. - You would feel balanced and calm. - You could plan for breaks without guilt. - You would be reliable for those around you. ## An Imperfect World The truth is we don't live in the type of world that is predictable. Your manager, co-worker, or client may suddenly take up half your day. And sometimes work just breaks down in unexpected ways. Your program crashes, a video recording gets corrupted, a code regression takes your whole day. When planning my day, I try to plan for the unexpected. ## Creativity in a Box Truthfully, not everything should be put into a box. Creative tasks need room to breathe and grow and change as you work through them. Some tasks should have a vague start and end time so that you can give your mind time to work on them and allow yourself to chase rabbit trails. ## The Problem with Task Managers I'm as guilty as anyone else at working on my task management system more than working on my tasks. I've used OmniFocus for more than 15 years and I've dabbled with almost every other task management system there is. As I'm sitting here, Jack, my AI assistant, runs a lot of my task management through an Obsidian Vault that syncs with GitHub. Over-complicate much? ## A Simple System I've devised a very simple system for each day that helps me get better at predicting how long tasks will take. At the beginning of your day, plan until about 1 p.m on a sheet of paper (writing it down feels like a commitment). Every block of time has three columns: - **Task:** a short description - **Estimated time:** the time I expect it to take - **Actual time:** the actual time it took me **How do you estimate time?** - Plan only about 60% of your day (hence the 1 p.m. cutoff). - Plan for the unexpected in your time blocks. Tactically, I block time by starting with the ideal scenario (if everything goes perfectly) and double that time for the unexpected. If the task involves another person (like a phone call with a person), I triple the time. For example, if I'm estimating a task that will take 30 minutes, I'll plan for 60 minutes. If the task involves another person, I'll plan for 90 minutes. If you are going to serve real people and be flexible to their real needs, you can't expect them to fit into a designated time slot or observe your carefully-curated schedule. As I progress through my day, I update the actual time column with the time it took to complete the task. Here's an example. | Task | Estimated time | Actual Time | |---|---|---| | Task 1 | 90 minutes | 65 minutes | | Task 2 | 1 hour | 1.5 hours | | Task 3 | 3 hours | 3.5 hours | Because I only plan until about 1 p.m., it gives me flexibility to adjust as things move around in my day. And if I finish early, I get to start on the things for the next day.Note: A few years ago, I realized that I was only ever going to get a certain number of tasks done each day. When I packed my day full, inevitably some task would get pushed to the next day. If, however, I underestimated what I could get done in a day, I could start on "tomorrow's tasks". I don't think this helps you get more or less done each day, but it convinces your brain that you're ahead rather than behind. It's a dumb mind trick, but it works on me.
Every day, my goal is to match or beat my estimated time with my actual time. Having done this now for several years, I've gotten fairly good at predicting how long tasks will take, even anticipating when there will be bumps in the road on a given task. Ultimately, this predictability is a superpower. Some weeks I'm very bad at it, but the habit helps me keep my commitments, leave margin for myself, and serve those around me in a way that honors their time. Productivity feels like satisfaction when reality matches your intention. # JavaScript Reduce Method https://chrispennington.dev/blog/reduce-method-javascript The reduce method is one of the most powerful array methods in JavaScript, but it can also be the most confusing. In this post, I'll explain how to use the reduce method in JavaScript. The reduce method is often ignored by JavaScript developers—even if they have a few years of experience. If you have a good grasp of the map, filter, and forEach methods, you may be able to get by for a while without learning the reduce method. Eventually, I ran into a problem and every Stack Overflow answer I found used the reduce method. I finally buckled and decided to learn it. And I’m so glad I did!Note: View a video overview of the reduce method on my YouTube channel.
## What is the reduce method? The reduce method takes in an array and returns any single value. ## Map, ForEach, or Filter, but with Superpowers! Reduce finally “clicked” when I realized that it’s like the other higher-order array methods, but with superpowers! So what superpowers does reduce have? Here are at least 3: 1. It can return any single value, not just an array (like map and filter). 2. It gives you access to the accumulated value at each loop. You always return this accumulated value so the next loop has access to it. The final result is the accumulated value after the last loop. 3. You can run checks inside the loop, reducing the number of loops you need to run (you can often replace a filter and a map with a single reduce). Let’s take a simple problem and solve it without and with the reduce method. Here’s how you might add up all numbers less than 4 in the `numbers` array using only filter and forEach. ```js const numbers = [1, 2, 3, 4, 5]; let sum = 0; numbers.filter((num) => num < 4).forEach((num) => (sum += num)); ``` While not wrong, it’s a bit messy to declare a variable and then mutate it inside the array loops. Additionally, because we’re using both the filter and the forEach method, it takes two loops to solve the problem. You could obviously compress it a bit more and do the check inside the forEach loop, but you still have that pesky variable declaration. How might you do the same thing with reduce? ```js const numbers = [1, 2, 3, 4, 5]; const sum = numbers.reduce((acc, num) => (num > 4 ? acc : (acc += num)), 0); ``` Let’s walk through that very slowly. ## How to Use the Reduce Method The reduce method takes in a callback function and an initial value. The callback function takes in two parameters: (1) the accumulated value and (2) the current value. The initial value is the starting value for the accumulated value. ### Step 1: Add a callback function and initial value The reduce method takes two items: a callback function and an initial value. ```js const sum = numbers.reduce(() => {}, 0); ``` I’ve written the callback function as an arrow function and started with the initial value of 0. Generally speaking, you should set the initial value to whatever type of value you want to return. For example, if you want to return a number, set the initial value to 0. If you want to return an array or object, set the initial value to an empty array or object.Note: While you don’t technically have to pass along an initial value, I always do. If you do not provide an initial value, the first item in your array is passed in as the starting point for your acc. Depending on your loop, this can produce inaccurate results.
### Step 2: Add the accumulated value and array item The callback function takes two important parameters: (1) the accumulated value and (2) the item in the array (these must be the first and second parameters you pass in). The accumulated value is the value that is returned after each loop. The item in the array is the current item in the array. ```js const sum = numbers.reduce((acc, num) => {}, 0); ``` The reduce method does take in a third and fourth parameter, but I don’t use them often. The third parameter is the index of the current item in the array. The fourth parameter is the array itself. So in all, the reduce method can take in four parameters: 1. The accumulated value (required) 2. The current item in the array (required) 3. The index of the current item in the array (optional) 4. The array itself (optional)Note: I usually call the first parameter, the accumulated value, `acc` and the second parameter, the item I’m looping over in the array, a name that makes sense for the array, like `num` for “number.”
### Step 3: Return the accumulated value Start by returning the accumulated value as the last action of each reduce loop. This passes along the accumulated value to each loop and then returns the full accumulated value after reduce has looped through every item in your array. ```js const sum = numbers.reduce((acc, num) => { return acc; }, 0); ``` ### Step 4: Add your logic Finally, add your logic to each loop. In this example, I’ve set up a guard clause to check if the number is less than 4. If it is, it skips that item in the loop and passes on the accumulated value up to that point to the next loop. If the current number is less than 4, it adds the number to the accumulated value and passes that along to the next loop. ```js const sum = numbers.reduce((acc, num) => { if (num > 4) { return; } return (acc += num); }, 0); ``` We can compress this a bit more by using a ternary and an implicit return. Nothing like a nice one-liner! ```js const sum = numbers.reduce((acc, num) => (num > 4 ? acc : (acc += num)), 0); ``` ## Understanding each reduce loop If we console.log the reduce method, we can see how it works. ```js const numbers = [1, 2, 3, 4, 5]; const sum = numbers.reduce((acc, num) => { console.log(`acc: ${acc}, num: ${num}`); return num > 4 ? acc : (acc += num); }, 0); // This ☝️ will print the following: // acc: 0, num: 1 // acc: 1, num: 2 // acc: 3, num: 3 // acc: 6, num: 4 // acc: 6, num: 5 ``` By way of explanation, - During the first loop, the accumulated value starts with the initial value of 0 (because we passed that in as the initial value) and the value of the current array item is 1 (because that’s the first number in the array) - During the second loop, the accumulated value is 1 and the current value is 2 - During the third loop, the accumulated value is 3 and the current value is 3 - During the fourth loop, the accumulated value is 6 and the current value is 4 (because 4 is not less than 4, the accumulated value is not changed) - During the fifth loop, the accumulated value is 6 and the current value is 5 (because 5 is not less than 4, the accumulated value is not changed) ## A few examples Here are a few examples of how and why you might use the reduce method. ### Example 1: Group an array of objects by a property Because you can return an object from a reduce method (superpower #1), you can use it to group an array of objects by a property. ```js const people = [ { name: "John", age: 20 }, { name: "Jane", age: 25 }, { name: "Jack", age: 20 }, { name: "Jill", age: 30 }, ]; const peepsByAge = people.reduce((acc, person) => { const key = person.age; const value = acc[key] || []; return { ...acc, [key]: [...value, person] }; }, {}); // This ☝️ will return the following: // { // 20: [{ name: 'John', age: 20 }, { name: 'Jack', age: 20 }], // 25: [{ name: 'Jane', age: 25 }], // 30: [{ name: 'Jill', age: 30 }] // } ```Note: During each loop, it grabs the age of the person as a key and first checks if the current accumulated object (which started as an emtpy object) has that key. If it does, it spreads in the value of that key and then adds the current person object to that value of the accumulated object.
### Example 2: Count the number of times a value appears in an array You can use reduce to count the number of times a value appears in an array. ```js const numbers = [1, 2, 3, 4, 5, 1, 2, 3, 4, 5]; const count = numbers.reduce((acc, num) => { const key = num; const value = acc[key] || 0; return { ...acc, [key]: value + 1 }; }, {}); // This ☝️ will return the following: // { // 1: 2, // 2: 2, // 3: 2, // 4: 2, // 5: 2 // } ```Note: Like the first example, during each loop, we identify the current key, check if it exists on the accumulated object, and then update the accumulated object. When it finishes looping over the array, the reduce method returns the accumulated object.
### Example 3: Remove duplicate values from an array You can use reduce to remove duplicate values from an array. ```js const numbers = [1, 2, 3, 4, 5, 1, 2, 3, 4, 5]; const unique = numbers.reduce( (acc, num) => (acc.indexOf(num) > -1 ? acc : [...acc, num]), [] ); // This ☝️ will return the following: // [1, 2, 3, 4, 5] ```Note: During each loop, it checks if the number exists in the accumulated array at that point in the loop. If it does exist, it passes on the accumulated array to the next loop. Otherwise, it spreads in the contents of the current accumulated array and then adds the num to that array. That new accumulated array is passed on to the next loop until the reduce loop finishes looping through each item in the array, at which point, it returns the final accumulated array.
# JavaScript new Date() Returns NaN or is Blank in Safari https://chrispennington.dev/blog/safari-does-not-show-new-date-from-javascript Why is my JavaScript not showing in Safari? Are you trying to add dates in the wrong format? Safari does not allow for all date formats and trying to add new events may show blank or throw an error in Safari if you’re using the wrong format. Today I was looping through dates to create a custom calendar page for a client site. When I viewed the published site in Safari, I was surprised to find a blank section on my page. It worked everywhere else and Safari dev tools showed no errors. ## The Problem: Date Format I was using a date format Safari doesn’t support (FWIW, IE doesn’t either, but that isn’t a big deal). ```javascript const date = new Date('2021-08-09') ``` But `yyyy-mm-dd` isn’t supported … ## The Solution: Change Date Formats So far as I can tell, the following formats are supported by all browsers. Switching your date format to one of these should fix the problem. ```javascript const nDate = new Date('2021, 07, 06'); // yyyy, mm, dd const nDate = new Date(2021, 07, 06, 10, 05, 00); // yyyy, mm, dd, hh, mm, ss const nDate = new Date(07/06/2021); // mm/dd/yyyy const nDate = new Date(07/06/2021 10:05:00); // mm/dd/yyyy hh:mm:ss const nDate = new Date(1625600237781); // milliseconds const nDate = new Date(Tue Jul 06 2021 10:05:00); // Day Mon dd yyyy hh:mm:ss ``` # Safari Mobile is Ignoring My CSS https://chrispennington.dev/blog/safari-mobile-text-is-too-big Safari will upscale your text if it thinks text on your site is too small. Here's how to fix it. When I made some changes to my blog, I noticed that mobile Safari only was showing certain sections of my codeblocks as large text. When I inspected the text, it said it was 16px, but it was clearly rendering closer to 20–22px. I tried a few things to fix it, but no changes in my CSS helped, resulting in this look: 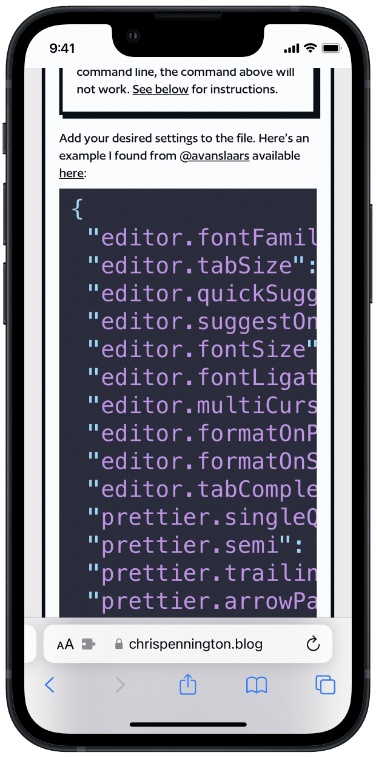 ## The Fix Turns out, if Safari thinks your text is too small, it will upscale it. To fix this, you can add the following to your CSS: ```css body { -webkit-text-size-adjust: 100%; } ``` To scope it to mobile only, you could place this inside of a media query: ```css @media only screen and (max-width: 480px) { body { -webkit-text-size-adjust: 100%; } } ``` # Stop Installing Packages the Second They're Published https://chrispennington.dev/blog/stop-installing-packages-the-second-theyre-published A short cooldown on new package versions would have stopped the axios attack, the nx attack, and Shai-Hulud. Here's how to set one up in every major JavaScript package manager. We've all seen the recent attacks: axios, Next.js, TanStack. I'm sure these won't be the last. Thankfully, it seems many of these attacks were found within hours. And thanks to recent new tooling in every major JavaScript package manager, you can now set up a simple cooldown on new package versions. (I'm assuming these changes came about because of the recent attacks?) ## A Simple Fix: Set a Minimum Release Age Every major JavaScript package manager now supports this. They all shipped the feature within six months of each other, but they also all chose different config names and different units.Obviously, adding a minimum age isn't going to guarantee you're not impacted, but it's a baseline starting point for reducing the impact of new package versions.
## Quick Reference | Manager | File | Example (3 days) | |---------|------|------------------| | pnpm | `pnpm-workspace.yaml` | `minimumReleaseAge: 4320` | | Yarn | `.yarnrc.yml` | `npmMinimalAgeGate: "3d"` | | Bun | `bunfig.toml` | `minimumReleaseAge = 259200` | | npm | `.npmrc` | `min-release-age=3` | Set it to 3–7 days, and move on. Here are more details about how to set it up in each one. ## pnpm pnpm was first, shipping `minimumReleaseAge` in v10.16 (September 2025). As of pnpm 11, it **defaults to 1 day**. It's the only package manager that enables this out of the box. The value is in **minutes**. ```yaml # pnpm-workspace.yaml minimumReleaseAge: 10080 # 7 days minimumReleaseAgeExclude: # if you want to exclude certain packages - '@yourorg/*' - webpack ``` [pnpm docs →](https://pnpm.io/settings#minimumreleaseage) ## Yarn Yarn shipped `npmMinimalAgeGate` in v4.10.0 (September 2025). It supports both raw minutes and duration strings. The exclusion list (`npmPreapprovedPackages`) accepts glob patterns and exact locators, which is more flexible than pnpm's package-name-only approach. The value is in **minutes** or a **duration string**. ```yaml # .yarnrc.yml npmMinimalAgeGate: "7d" npmPreapprovedPackages: # if you want to exclude certain packages - '@yourorg/*' - typescript ``` [Yarn docs →](https://yarnpkg.com/configuration/yarnrc#npmMinimalAgeGate) ## Bun Bun added `minimumReleaseAge` in v1.3 (October 2025). Bun's own repo uses it set to 3 days. The value is in **seconds**. ```toml # bunfig.toml [install] minimumReleaseAge = 604800 # 7 days # Packages that bypass the gate minimumReleaseAgeExcludes = ["@types/bun", "typescript"] ``` [Bun docs →](https://bun.com/docs/runtime/bunfig#install-minimumreleaseage) Some common days in seconds: - 604800 (7 days) - 259200 (3 days) - 86400 (1 day) ## npm npm shipped `min-release-age` in v11.10.0 (February 2026). It's the simplest to configure but doesn't yet have a built-in exclusion mechanism. The value is in **days**. ```ini # .npmrc min-release-age=7 ``` [npm docs →](https://docs.npmjs.com/cli/v11/using-npm/config#min-release-age) # Send iMessage With AppleScript https://chrispennington.dev/blog/send-imessage-with-applescript You can pass variables or arguments into an AppleScript to send custom messages to specific people. The friction to open Messages and respond to text messages I receive is enough that I often forget to respond. Normally this isn’t a big deal, but it’s been a frustration to my wife because I regularly forgot to respond to her texts (and I don’t blame her!). ## Get the AppleScript I wrote up a quick AppleScript today that I embedded in a quick Raycast Script. It requires text content for the message and then takes that input and makes it the textMessage.Note: There are scripts around that show you how to use AppleScript to dynamically search for names in the Contacts app. You could pass that into Raycast and then process that as another variable.
```applescript #!/usr/bin/osascript # Required parameters: # @raycast.schemaVersion 1 # @raycast.title Text Person # @raycast.mode silent # Optional parameters: # @raycast.icon 💬 # @raycast.argument1 { "type": "text", "placeholder": "Enter text message" } # Documentation: # @raycast.description Send Person a Text Message # @raycast.author Chris Pennington # @raycast.authorURL @cpenned on Twitter on run argv tell application "Messages" set targetBuddy to "(XXX) XXX-XXXX" set targetService to id of 1st account whose service type = iMessage set textMessage to ( item 1 of argv ) set theBuddy to participant targetBuddy of account id targetService send textMessage to theBuddy end tell log "Message sent" end run ``` To use this in Raycast, save the text above to a file and open Raycast Preferences. Click on **Extensions** and select **Script Commands**. Click **Add Directories** on the right and open the directory where you saved the script. I recorded a hotkey in the Raycast Preferences pane to make running the script easy. Hope this helps! # Shortcut For macOS Save Dialog https://chrispennington.dev/blog/shortcut-for-macos-save-dialog Did you know you can enter a terminal-like save dialog option in macOS? While saving any file in the macOS dialog, you can press the / key to enter a terminal-like path. You can even move *and* save at the same time.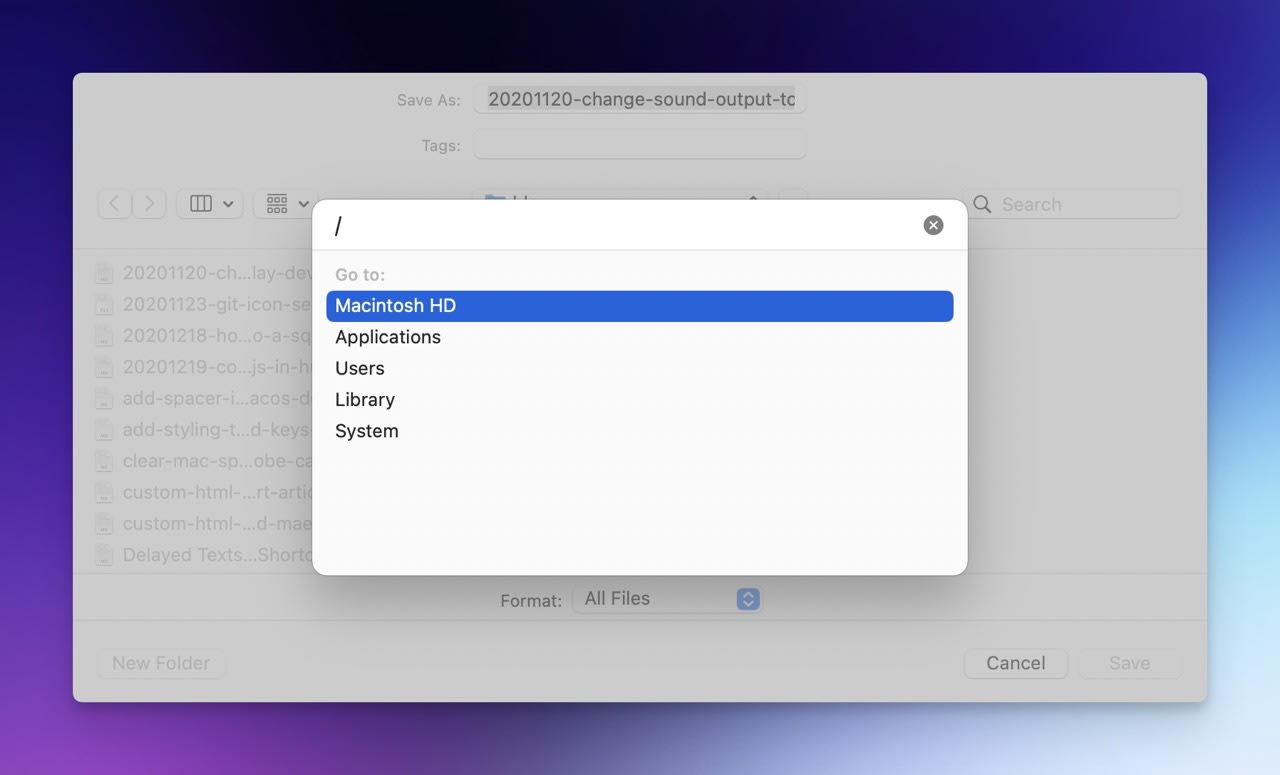 # Templating Classes in Astro
https://chrispennington.dev/blog/templating-classes-in-astro
You can included templated language in Astro components to scaffold out dyanmic classes with the class:list directive.
Astro is a new static site generator that I’m quite taken with. Whenever I have time, I’d like to redo this blog in Astro.[^1] Like React, Vue, and other JS frameworks, Astro is built on components, which you can use to template out a site.
## Dymnaic values in components
When creating components, you’ll quickly find you want to pass in dynamic classnames into components. For instance, a simple button component using Tailwind CSS might look like this:
```astro
---
const { bkg, color, btnText, link } = Astro.props;
---
{btnText}
```
Calling the component would look like this:
```astro
---
import Button from "../components/Button.astro"
---
```
Notice how we’re passing in dynamic values for the color and background color. While this is a simple example, sometimes you’ll want to pass in an array or object full of classes.
Astro has a built-in directive ([class:list](https://docs.astro.build/en/reference/directives-reference/#classlist)) meant for taking in arrays, sets, objects, strings, and more. Whatever array you pass in is flattened and added in the class attribute.
## Class:list syntax
When advancing beyond passing in basic strings, you may have objects, arrays, etc. that contain groups of classes you want to dynamically pass into your button Astro component.
The [class:list documentation](https://docs.astro.build/en/reference/directives-reference/#classlist) explains that the class:list={…} directive “takes an array of class values and converts them into a class string.”
The documentation lists four examples:
- string: Added to the element class
- Object: All truthy keys are added to the element class
- Array: flattened
- Set: flattened
Any duplicate values are removed automatically.
Here’s the example from their docs:
```astro
```
Like most things Astro, I continue to be impressed with the attention to the dev experience all while giving such care to the client-side result.
[^1]: The entire site needs to be rebuilt from start to finish. It’s a total mess. 🤣 It’s a solid 1.5 years old and was *hacked* together back then with my limited abilities!
# VS Code Keyboard Shortcuts for Coding Productivity
https://chrispennington.dev/blog/vs-code-keyboard-shortcuts-for-coding-productivity
VS Code is a powerful tool made more powerful and quick by a few key keyboard shortcuts. Here are VS Code keyboard shortcuts I use every day to be more productive while coding.
If you get these 15 keyboard shortcuts under your fingers, you’ll dramatically speed up your coding productivity. You can find a more extensive list for either Windows or MacOS here:
- [VS Code Keyboard Shortcuts Windows](https://code.visualstudio.com/shortcuts/keyboard-shortcuts-windows.pdf)
- [VS Code Keyboard Shortcuts macOS](https://code.visualstudio.com/shortcuts/keyboard-shortcuts-macos.pdf)
# Templating Classes in Astro
https://chrispennington.dev/blog/templating-classes-in-astro
You can included templated language in Astro components to scaffold out dyanmic classes with the class:list directive.
Astro is a new static site generator that I’m quite taken with. Whenever I have time, I’d like to redo this blog in Astro.[^1] Like React, Vue, and other JS frameworks, Astro is built on components, which you can use to template out a site.
## Dymnaic values in components
When creating components, you’ll quickly find you want to pass in dynamic classnames into components. For instance, a simple button component using Tailwind CSS might look like this:
```astro
---
const { bkg, color, btnText, link } = Astro.props;
---
{btnText}
```
Calling the component would look like this:
```astro
---
import Button from "../components/Button.astro"
---
```
Notice how we’re passing in dynamic values for the color and background color. While this is a simple example, sometimes you’ll want to pass in an array or object full of classes.
Astro has a built-in directive ([class:list](https://docs.astro.build/en/reference/directives-reference/#classlist)) meant for taking in arrays, sets, objects, strings, and more. Whatever array you pass in is flattened and added in the class attribute.
## Class:list syntax
When advancing beyond passing in basic strings, you may have objects, arrays, etc. that contain groups of classes you want to dynamically pass into your button Astro component.
The [class:list documentation](https://docs.astro.build/en/reference/directives-reference/#classlist) explains that the class:list={…} directive “takes an array of class values and converts them into a class string.”
The documentation lists four examples:
- string: Added to the element class
- Object: All truthy keys are added to the element class
- Array: flattened
- Set: flattened
Any duplicate values are removed automatically.
Here’s the example from their docs:
```astro
```
Like most things Astro, I continue to be impressed with the attention to the dev experience all while giving such care to the client-side result.
[^1]: The entire site needs to be rebuilt from start to finish. It’s a total mess. 🤣 It’s a solid 1.5 years old and was *hacked* together back then with my limited abilities!
# VS Code Keyboard Shortcuts for Coding Productivity
https://chrispennington.dev/blog/vs-code-keyboard-shortcuts-for-coding-productivity
VS Code is a powerful tool made more powerful and quick by a few key keyboard shortcuts. Here are VS Code keyboard shortcuts I use every day to be more productive while coding.
If you get these 15 keyboard shortcuts under your fingers, you’ll dramatically speed up your coding productivity. You can find a more extensive list for either Windows or MacOS here:
- [VS Code Keyboard Shortcuts Windows](https://code.visualstudio.com/shortcuts/keyboard-shortcuts-windows.pdf)
- [VS Code Keyboard Shortcuts macOS](https://code.visualstudio.com/shortcuts/keyboard-shortcuts-macos.pdf)
Note: If these are new to you, start with one or two and then return for more once you master a few. Before long, you’ll forget how to use a mouse 😏.
## Sidebar - ⌘ + B (toggle sidebar) - ⌘ + ⇧ + E (open file explorer in the sidebar) - ⌘ + ⇧ + F (open search panel in the sidebar) - ⌘ + ⇧ + X (open extensions panel in the sidebar) ## Tabs/Files - ⌘ + P (open file) - ⌃ + ⌘ + → OR ⌃ + ⌘ + ← (split/collapse tab to the right OR left) - ⌥ + ⌘ + ← OR ⌥ + ⌘ + → (rotate through tabs in a panel) - ⌘ + w (close current tab) ## Multi selects - ⌘ + d (select next instance in file) - ⌘ + ⇧ + l (select all instances in file) - ⌥ + ⌘ + ↑ OR ⌥ + ⌘ + ↓ (add cursor up/down) - ⌥ and Click (add/remove cursor) ## Symbols/Function Definitions - ⌘ (hover to peek definition; click to go to definition) - F2 (rename selected symbol) ## Command Palette shortcut - ⌘ + ⇧ + P (open command palette) # Why Time Tracking Is The Secret To Productivity https://chrispennington.dev/blog/why-time-tracking-is-the-secret-to-productivity Until you know how long each task will take you, you can’t be predictably productive. I was talking with some friends yesterday and mentioned the power of time tracking. It’s not that everyone should track time all the time, but you almost _have_ to track time in order to be able to be productive. ## Here’s why 1. We all have the same time each day. 2. The choice is how to spend that time. 3. Most of us don’t know how long it takes us to do certain tasks, underestimating by nearly half. 4. Until you know how long tasks take, you can’t predictably plan. It’s this reason I think **the secret to productivity is predictably knowing how long each task will take you.** If someone asks you to do a specific job, you can only be predictably productive if you can accurately predict how long it will take you to do the task. ## An analogy Think about it like a market. We all have the same money (time). If you don’t know how long each task will take you, it’s like you’ve taken off all the price tags. You’re selecting tasks and not knowing the cost until you go to pay. Perhaps you can make accurate time predictions without time tracking, but I’ve found it essential.